

Clients
WireGuard clients are independent outbound tunnel interfaces from this node to a remote WireGuard endpoint. Sylve assigns each client its own interface, shown as wgc followed by its identifier. Enable the WireGuard system service from System Settings → Services before creating a client.
Use the Server page for remote devices that connect to this node instead.
What you can do with it
Section titled “What you can do with it”Use an outbound client when the Sylve node needs to join a WireGuard network managed elsewhere. Common examples include connecting the node to an office network, a second site, a VPN provider, or a remote backup network. Each connection is separate, so one can reach an office LAN while another carries only backup traffic.
The remote WireGuard administrator or VPN provider gives you a configuration file or the values inside it. You import that configuration into Sylve, decide which traffic should use the tunnel, then check the connection status here.
Status and controls
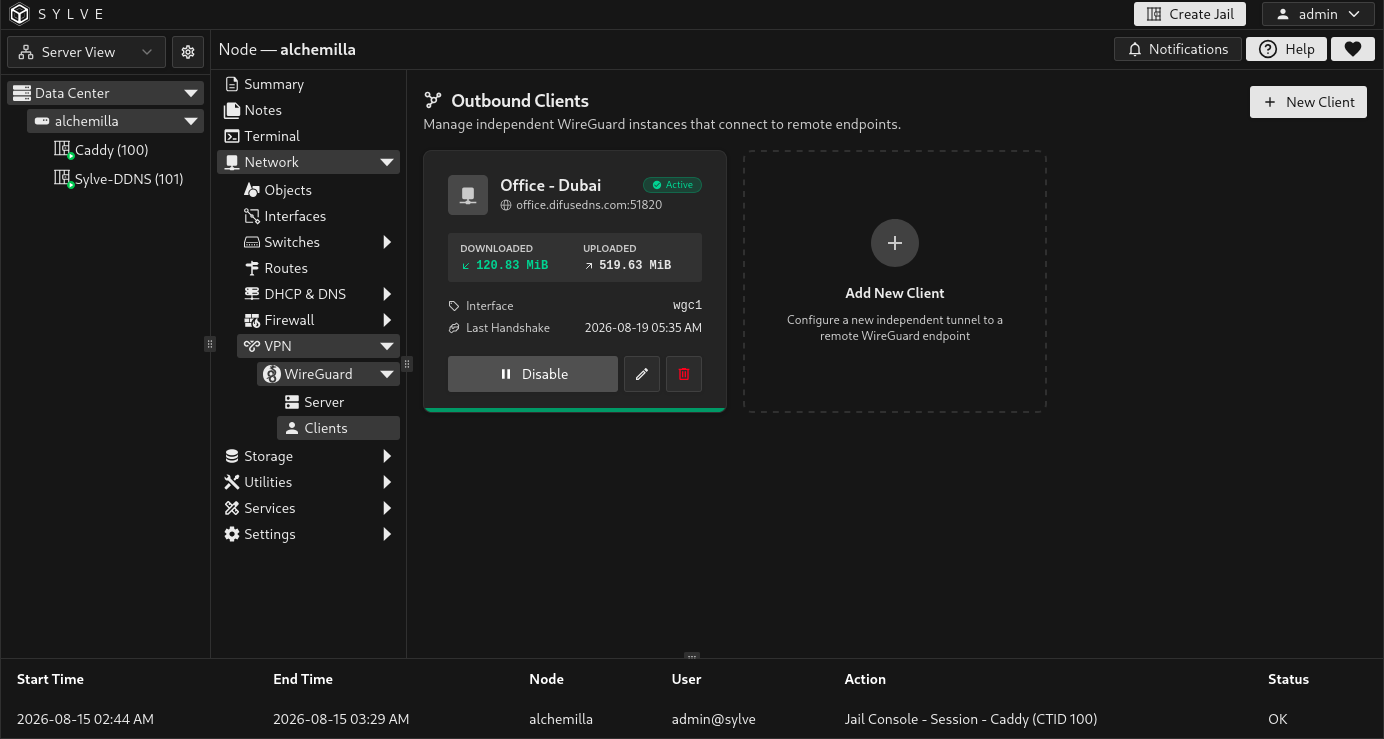
Section titled “Status and controls”The page refreshes visible client status every two seconds. The node samples WireGuard runtime state every five seconds, so a new handshake or transfer normally appears within a few seconds. Use the enable switch to bring a stored client up or down, Edit to change it, and Delete to remove its configuration and tunnel interface.
| Status | Meaning |
|---|---|
| Active | The interface is up and the remote peer has recently completed a handshake. |
| Idle | The interface is up, but no recent peer handshake is available. This can be normal for an on-demand tunnel. |
| Disconnected | The client is enabled but its interface is unavailable, its runtime state cannot be read, or its latest handshake is stale. |
| Disabled | The client is stored but its tunnel interface is not active. |
Transfer values are cumulative for the managed client across interface restarts. By comparison, wg show reports counters for the current interface lifetime.
Sylve retries enabled clients every 30 seconds when a transient startup or endpoint-resolution problem leaves their runtime interface missing. It also resolves hostname endpoints again and reapplies a client when the resolved address changes. Managed routes are reconciled after recovery, so a brief DNS or network failure does not require recreating the client.
Import or enter a client configuration
Section titled “Import or enter a client configuration”Choose New Client. The quickest route is to import the standard .conf or .txt file supplied by the remote WireGuard administrator. You can also paste the same configuration text. Sylve reads common [Interface] and [Peer] values and fills the form.
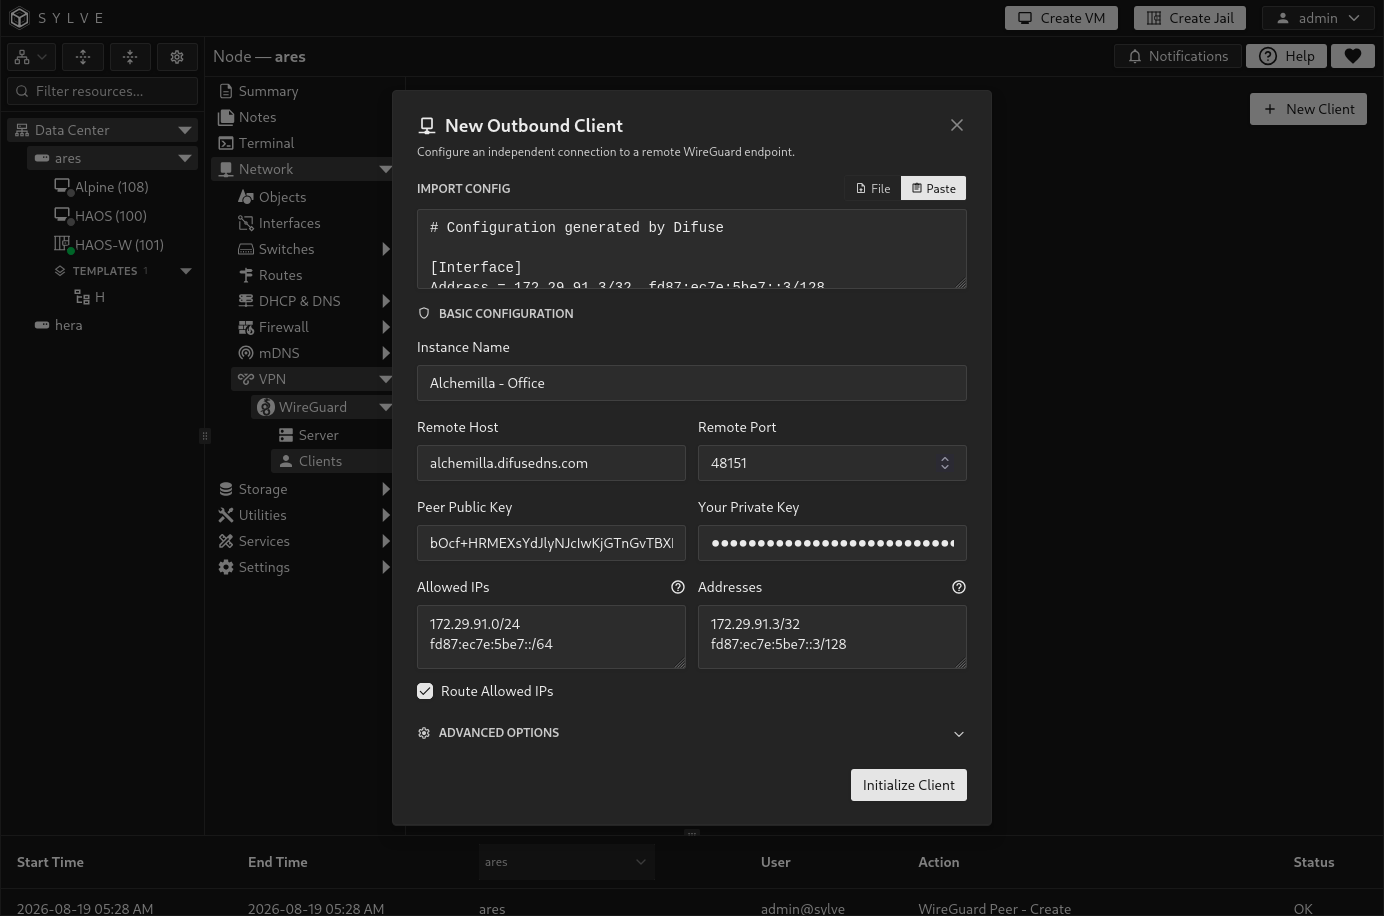
Review imported values before saving, especially Allowed IPs, Addresses, and Route Allowed IPs. A configuration file cannot know whether this node should send all traffic into the tunnel or only traffic for a remote network.
| Field | What it controls |
|---|---|
| Instance Name | Required local name for this connection, up to 128 bytes. Each client name must be unique. |
| Remote Host | Remote endpoint hostname or IPv4/IPv6 address. Bracketed IPv6 input is accepted and stored without brackets. |
| Remote Port | UDP port of the remote endpoint, from 1 to 65535. |
| Peer Public Key | Public key of the remote WireGuard peer. |
| Your Private Key | Private key for this node’s end of the tunnel. It is required and Sylve derives the matching public key. |
| Allowed IPs | Required CIDRs the remote peer is allowed to route. Enter one CIDR per line. |
| Addresses | Required addresses assigned locally to this client tunnel, one CIDR per line. |
| Route Allowed IPs | Adds routes for the allowed CIDRs through this WireGuard client. Disable it if another route or policy should own those destinations. |
A simple remote-network example
Section titled “A simple remote-network example”Suppose an office gateway gives you 10.50.0.2/32 as this node’s tunnel address and its office LAN is 192.168.50.0/24. Enter 10.50.0.2/32 under Addresses and 192.168.50.0/24 under Allowed IPs, then leave Route Allowed IPs enabled. The Sylve node will send traffic for the office LAN through the tunnel while ordinary internet traffic continues to use its normal gateway.
Do not add 0.0.0.0/0 or ::/0 unless you deliberately want a full-tunnel connection. Those CIDRs mean all IPv4 or all IPv6 destinations.
Advanced options
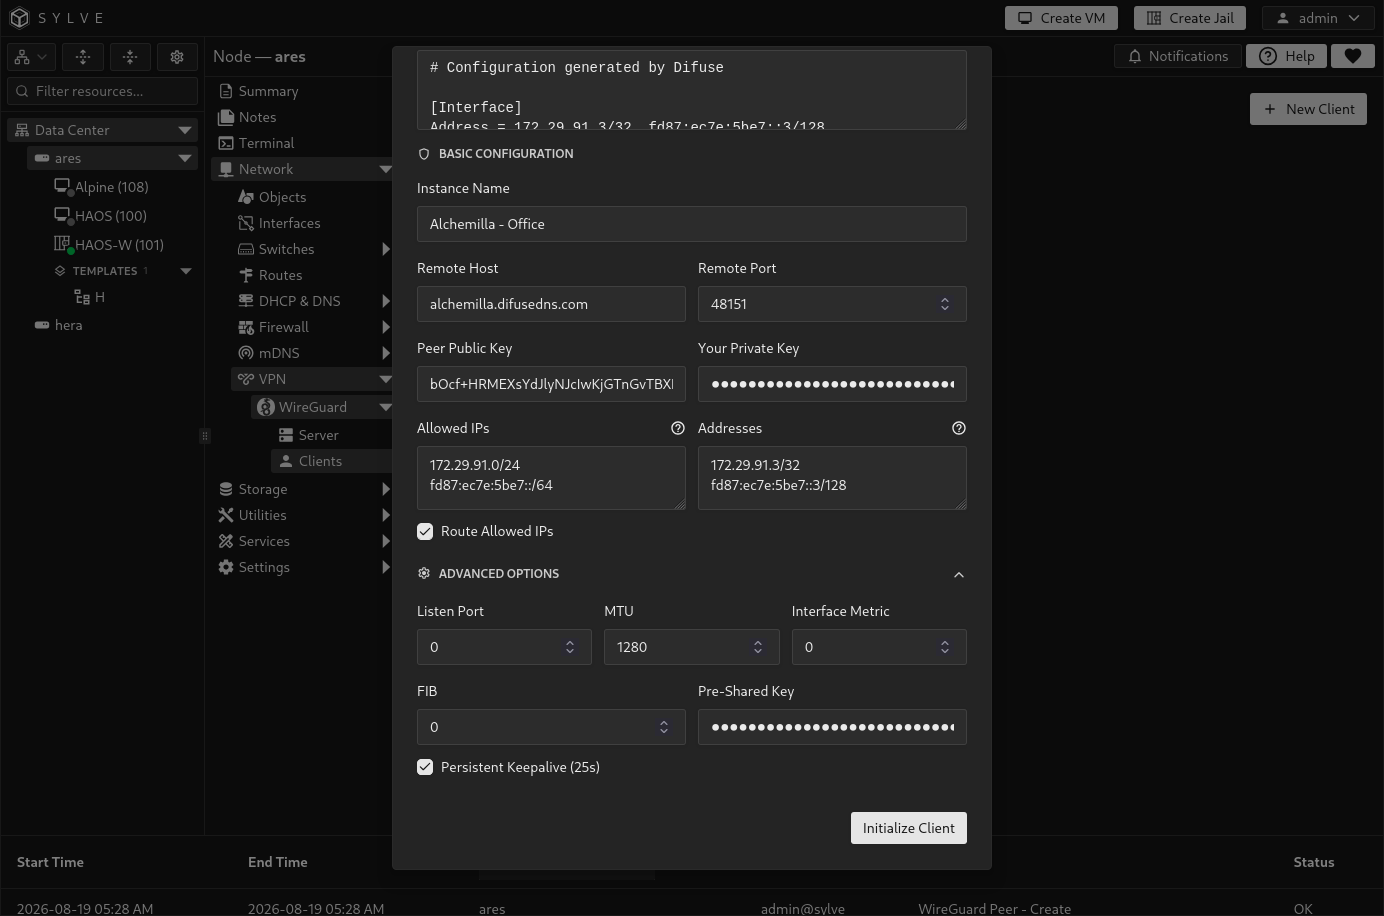
Section titled “Advanced options”Open Advanced Options only when the remote administrator has asked for one of these values or when you have a deliberate routing design. Most imported configurations can retain the defaults.
| Field | What it controls |
|---|---|
| Listen Port | Optional local UDP source port. Set 0 for an automatically chosen port. |
| MTU | Tunnel MTU. The default is 1280; Sylve accepts values from 576 to 9000. |
| Interface Metric | The FreeBSD metric assigned to this tunnel interface. Sylve applies it with ifconfig; it does not set a metric on the routes created for Allowed IPs. Leave it at 0 unless a network design or administrator specifically requires another interface metric. |
| FIB | FreeBSD routing table used by the client. 0 is the main routing table. |
| Pre-Shared Key | Optional additional symmetric key shared with the remote peer. |
| Persistent Keepalive | Sends a 25-second keepalive to preserve NAT state for the remote connection. |
When Allowed IPs contains 0.0.0.0/0 or ::/0, the form automatically selects an unused non-default FIB. This keeps a full-tunnel client from routing its own endpoint connection back into the tunnel. Sylve has FIBs 0 through 7; use the automatically selected value unless you have a deliberate multi-table routing design.
For a full-tunnel client, confirm that the remote endpoint itself remains reachable through the node’s ordinary internet connection. Sylve’s separate FIB selection is designed to preserve that path, but any additional routes or firewall policy you create must also allow the endpoint traffic.