

Jellyfin in a Jail
This guide builds on Simple Jail. It covers only the settings and installation steps that differ when the jail will run Jellyfin instead of AdGuard Home.
Follow the Simple Jail guide through Start and verify the jail, applying the changes below while creating the jail. Stop before Install AdGuard Home. Do not install AdGuard Home in the Jellyfin jail.
The Intel GPU steps are optional. They require a supported Intel integrated GPU, a working graphics driver on the FreeBSD host, and visible dri or drm device nodes. Jellyfin can run without a GPU, but video that the client cannot play directly will be transcoded by the CPU.
Changes from Simple Jail
Section titled “Changes from Simple Jail”Use the same host networking, FreeBSD 15.x base, storage, network, and startup behavior described in Simple Jail, except for the changes in this section.
On the Basic tab, use these Jellyfin-specific values:
- Jail Name:
Jellyfin - Hostname:
jellyfin - Description:
Jellyfin media server
Choose an unused Jail ID. Leave the other fields as described in Simple Jail: Basic.
Hardware
Section titled “Hardware”Jellyfin needs more headroom than the AdGuard Home example. A reasonable starting point for a small library is:
- Set CPU Cores to at least
2. - Set Memory Size to at least
2 GiB. - Keep Boot Order set to
1. - Keep Start On Boot enabled.
- Keep Resource Limits enabled initially.
Library size, concurrent streams, subtitles, and software transcoding can increase CPU and memory use substantially. Monitor the jail and adjust its Hardware limits when necessary. Disabling limits lets Jellyfin compete for all host CPU and memory, which can affect Sylve and other guests.
Optional Intel GPU access
Section titled “Optional Intel GPU access”First confirm on the FreeBSD host that the graphics driver is loaded and device nodes exist:
ls -l /dev/dri /dev/drmIf neither path exists, configure the supported Intel graphics driver on the host before continuing. The jail cannot use a GPU device that the host has not created.
To expose the Intel GPU to the jail, enable Custom Devfs Ruleset and enter:
add path 'dri' unhideadd path 'dri/*' unhideadd path 'drm' unhideadd path 'drm/*' unhideSylve automatically includes its standard jail DevFS rules before adding these custom rules. These rules make the GPU device nodes visible inside the jail while retaining their host-defined ownership and permissions. Do not expose unrelated devices. Device access weakens isolation and allows software in the jail to interact with host hardware.
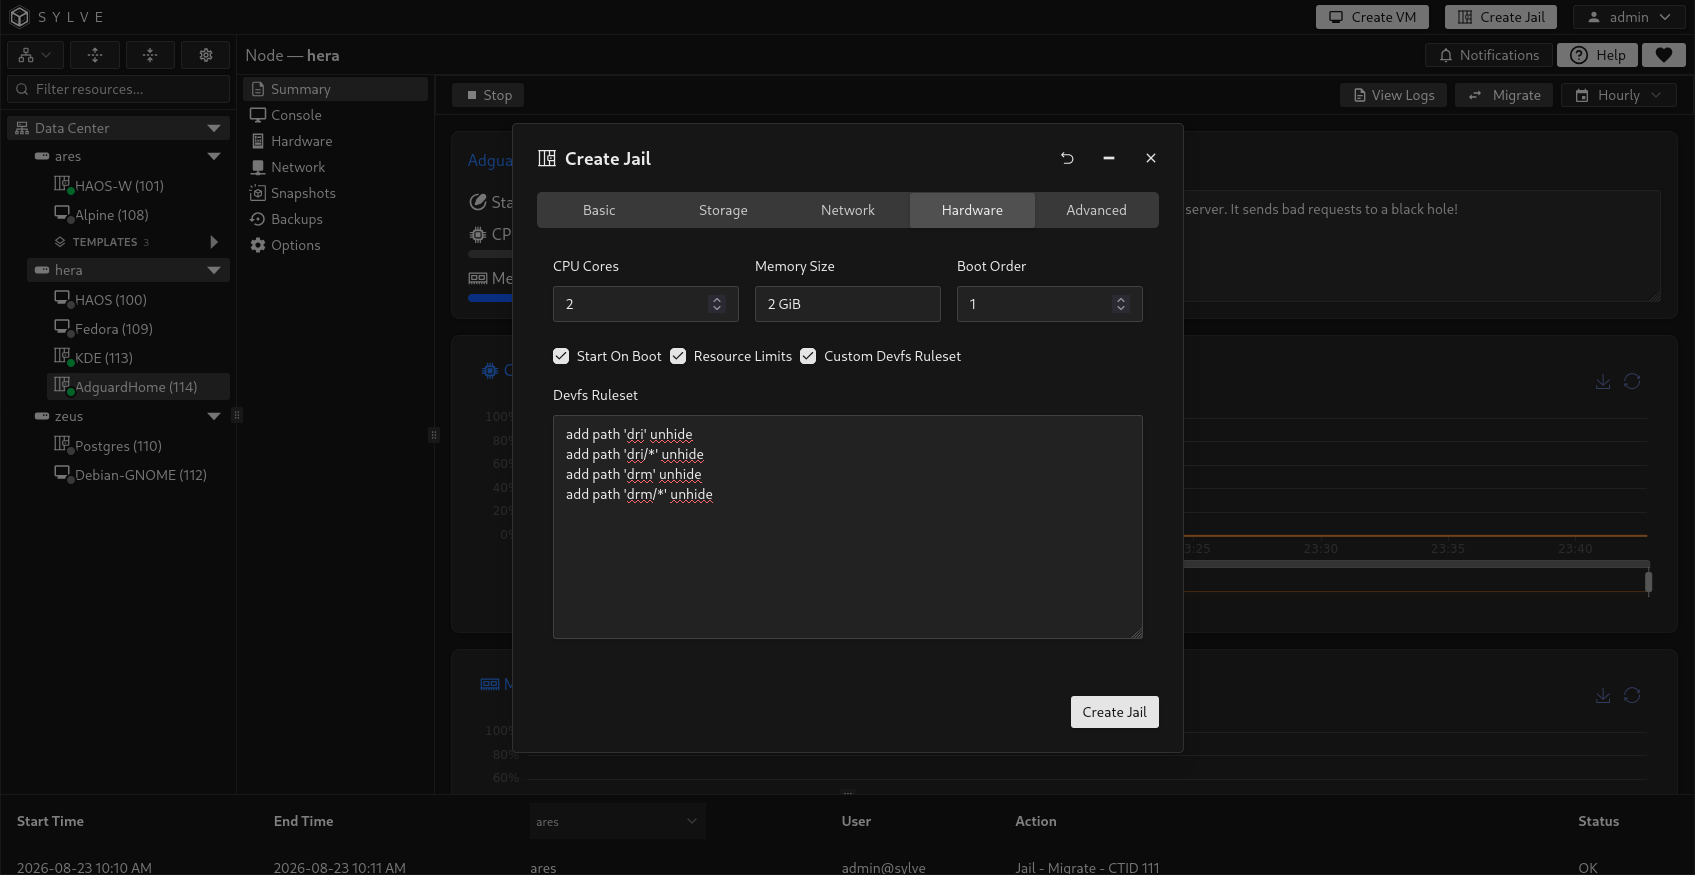
If you do not want hardware transcoding, leave Custom Devfs Ruleset disabled.
Advanced
Section titled “Advanced”Keep every default allowed option and leave the custom lifecycle hooks disabled as described in Simple Jail: Advanced. Additionally select Memory Locking (allow.mlock), which permits the .NET runtime used by Jellyfin to lock memory.
Finish creating and starting the jail, then note its assigned IP address. The remaining commands run as root inside the Jellyfin jail.
Install Jellyfin
Section titled “Install Jellyfin”Update the package catalog and install Jellyfin:
pkg updatepkg install -y jellyfinFor Intel GPU transcoding, also install the VA-API tools and Intel media driver:
pkg install -y libva libva-utils libva-intel-media-driver gmmlibAdd the Jellyfin service account to the video group so it can open GPU device nodes:
pw groupmod video -m jellyfinSkip the GPU packages and group change if you are using CPU transcoding only.
Enable and start Jellyfin:
service jellyfin enableservice jellyfin startservice jellyfin statusConfirm that the web interface is listening:
sockstat -4 -6 -l | grep ':8096'If the service does not remain running, inspect its recent messages:
tail -n 100 /var/db/jellyfin/log/log_*.logComplete the setup wizard
Section titled “Complete the setup wizard”From another device on the same network, open:
http://<jail-ip>:8096/Replace <jail-ip> with the address noted earlier. The setup wizard asks you to create the first administrator, choose a language, and add media libraries. Use a strong password because this account controls the server and its media.
Before other devices begin relying on Jellyfin, reserve the jail’s DHCP lease on your router or configure an appropriate static address. A stable address also makes bookmarks and client connections reliable.
Verify Intel hardware acceleration
Section titled “Verify Intel hardware acceleration”Skip this section if you did not expose an Intel GPU.
Inside the jail, confirm that the devices are visible and VA-API can query the driver:
ls -l /dev/dri /dev/drmvainfovainfo should identify an Intel driver and list supported codec profiles. A permission error usually means the device ownership does not match the jail’s video group or the Jellyfin service needs to be restarted after its group membership changed. A missing device means the host driver or custom DevFS ruleset is incomplete.
In Jellyfin, open Dashboard → Playback → Transcoding, select Video Acceleration API (VA-API), and use the render device reported by the system, commonly /dev/dri/renderD128. Enable only the codecs that vainfo reports as supported.
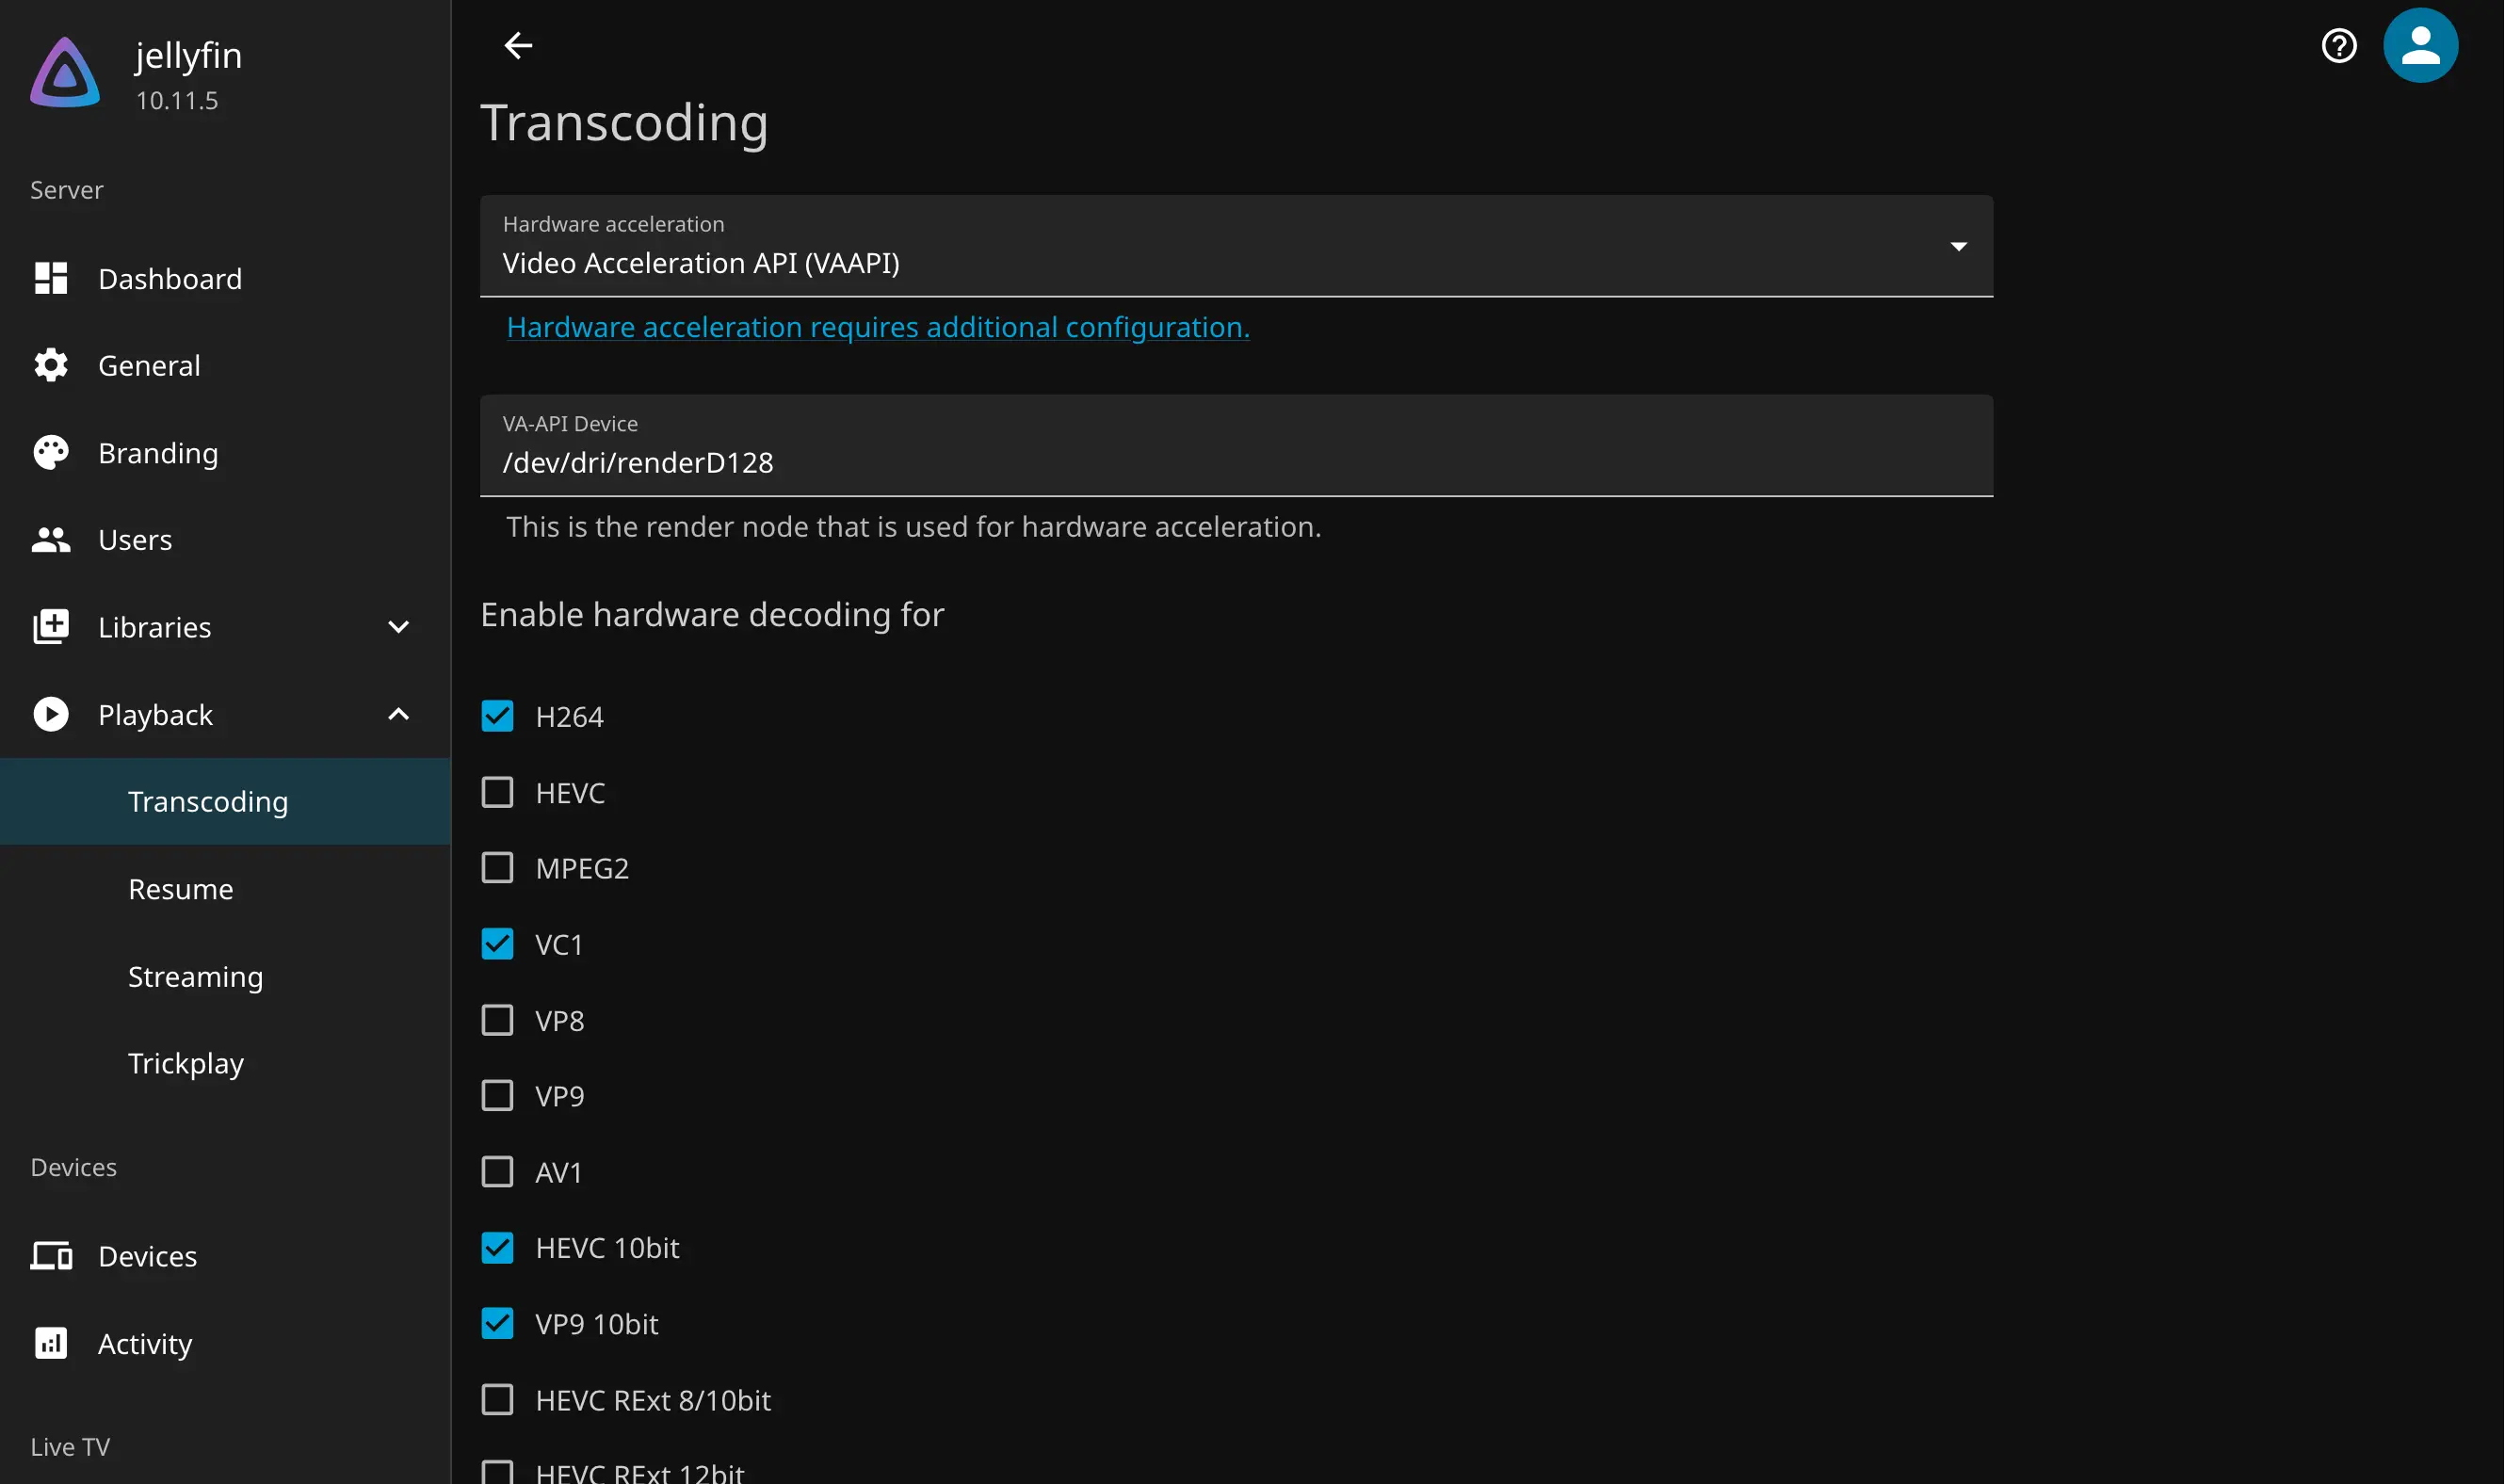
Play a video that requires transcoding and inspect its playback information. Confirm that Jellyfin reports hardware transcoding before depending on GPU acceleration.
Create and mount media storage
Section titled “Create and mount media storage”After the jail has been created, open Storage → ZFS → Datasets → File Systems and select New. First create a parent dataset named media. Then create a child dataset named jellyfin beneath it. The resulting hierarchy is <pool>/media/jellyfin.
The parent groups media-related datasets together and leaves room for sibling datasets used by other applications. Store Jellyfin’s library in the jellyfin child and apply any Jellyfin-specific quota or storage properties there. The screenshot keeps the default properties. Adjust them only when you have a specific storage requirement.
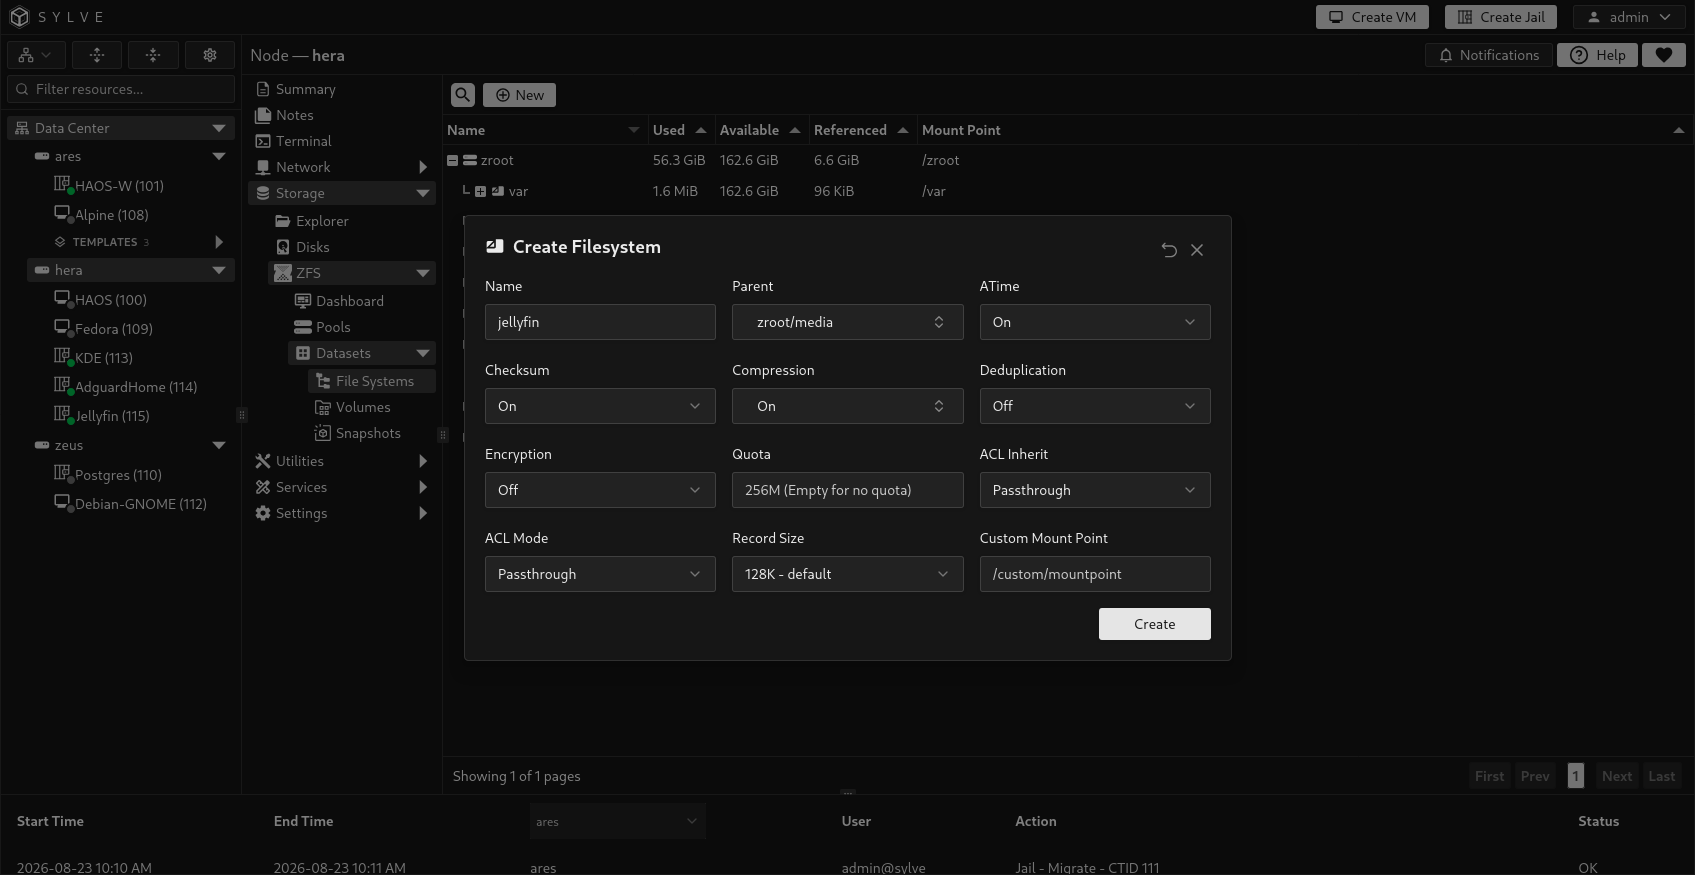
The example below assumes that the parent is mounted on the host at /media and the child at /media/jellyfin. Substitute the actual child mountpoint shown by ZFS.
Mount the dataset in the jail
Section titled “Mount the dataset in the jail”Create the destination directory inside the running jail if it does not already exist:
mkdir -p /media/jellyfinStop the jail. Open Options → FSTab Entries, select Edit FSTab Entries, and add a nullfs entry:
/media/jellyfin /zroot/sylve/jails/<jail-id>/media/jellyfin nullfs rw 0 0Replace the first path with the dataset’s host mountpoint. Replace the second path with the real host path to /media/jellyfin inside the jail root. The example assumes the jail dataset is mounted below /zroot/sylve/jails/<jail-id>.
Start the jail and confirm that the mount is present:
root@jellyfin:~ # mount | grep '/media/jellyfin'/media/jellyfin on /media/jellyfin (nullfs, local)root@jellyfin:~ #Grant media access
Section titled “Grant media access”Jellyfin normally runs with UID 868 on FreeBSD. Confirm the actual identity inside the jail:
id jellyfinThen grant that UID access from the FreeBSD host. For an NFSv4 ACL dataset and UID 868, the existing example uses:
setfacl -m u:868:rwx:fd:allow /media/jellyfinUse the UID reported by id jellyfin and the actual dataset mountpoint. When sharing the dataset with other jails, grant each service only the access it needs. Avoid making the complete media tree writable by every user.
Your Jellyfin server is now running in a jail and will start automatically whenever Sylve starts the jail. Before package upgrades or major configuration changes, create a jail Snapshot or Backup.