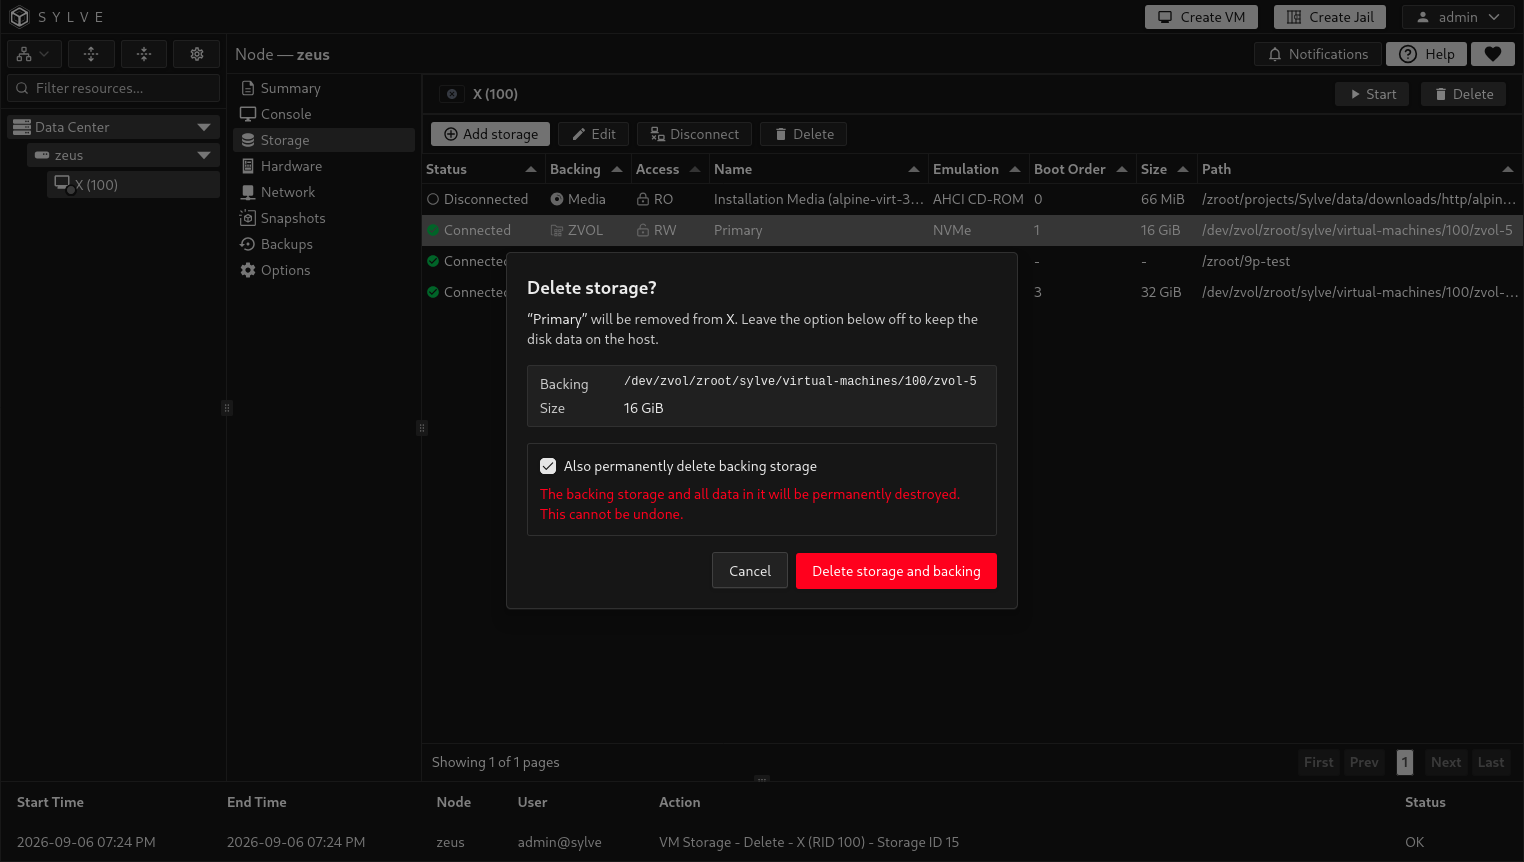

Storage
The Storage page lists the disks, media, and filesystem shares configured for a VM. Status shows Connected or Disconnected, Backing distinguishes ZVOL, RAW, Media, and 9P, and Access shows RW (writable) or RO (read-only). The table also shows names, emulation, boot order, sizes, and resolved paths.
Connected means the attachment is included in the VM’s configuration, not that the VM is running.
Add storage
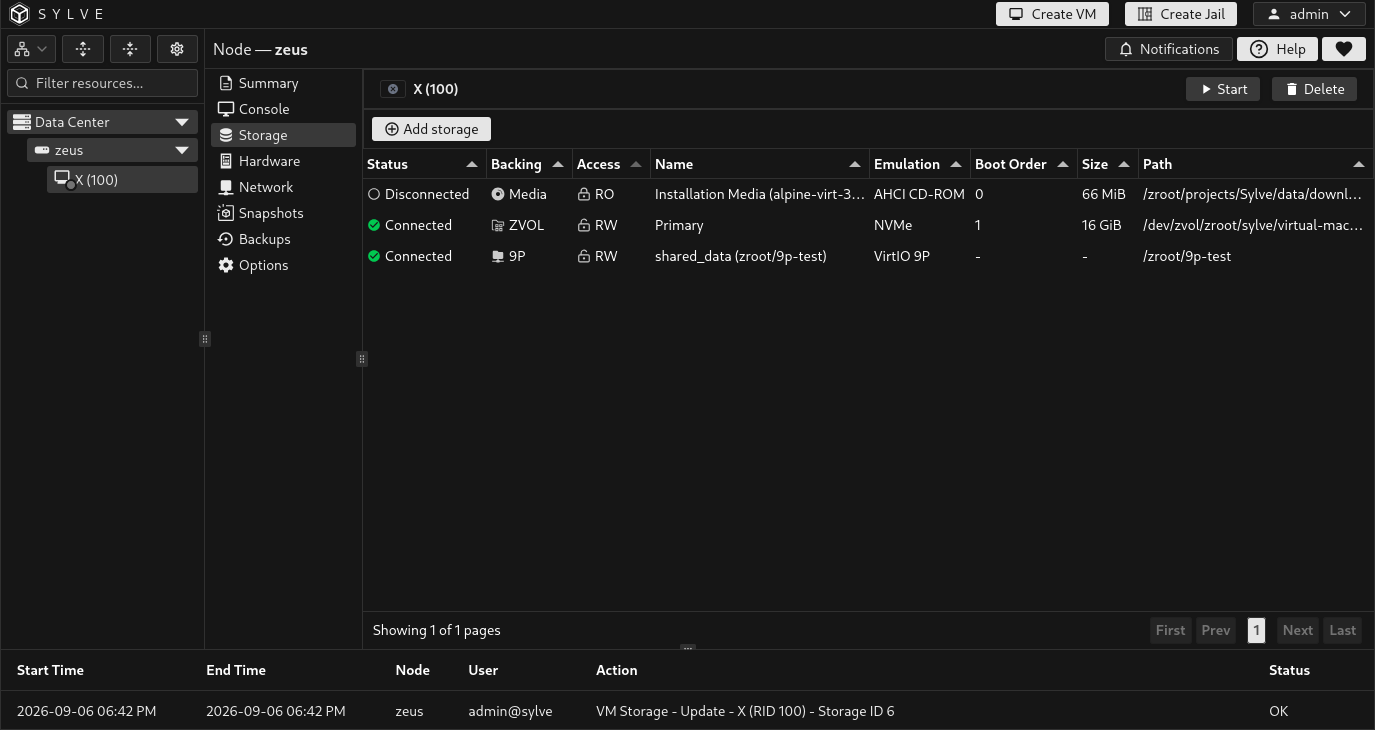
Section titled “Add storage”Select Add storage, then choose an operation:
| Choice | Purpose |
|---|---|
| Create empty disk | Allocate a new writable disk for an OS installation or guest data. |
| Create disk from image | Copy a downloaded disk image into writable managed storage. |
| Attach read-only media | Reference an installer ISO or disk image directly from Downloader. |
| Share filesystem | Share an existing host ZFS filesystem through VirtIO 9P. |
| Advanced host import | Import a regular RAW file on the host or an existing ZFS volume. |
Each choice opens its own form. Review the Operation preview before submitting: it explains the source, action, result, and whether the source is copied, moved, or shared. The back arrow returns to the choices.
Create an empty disk
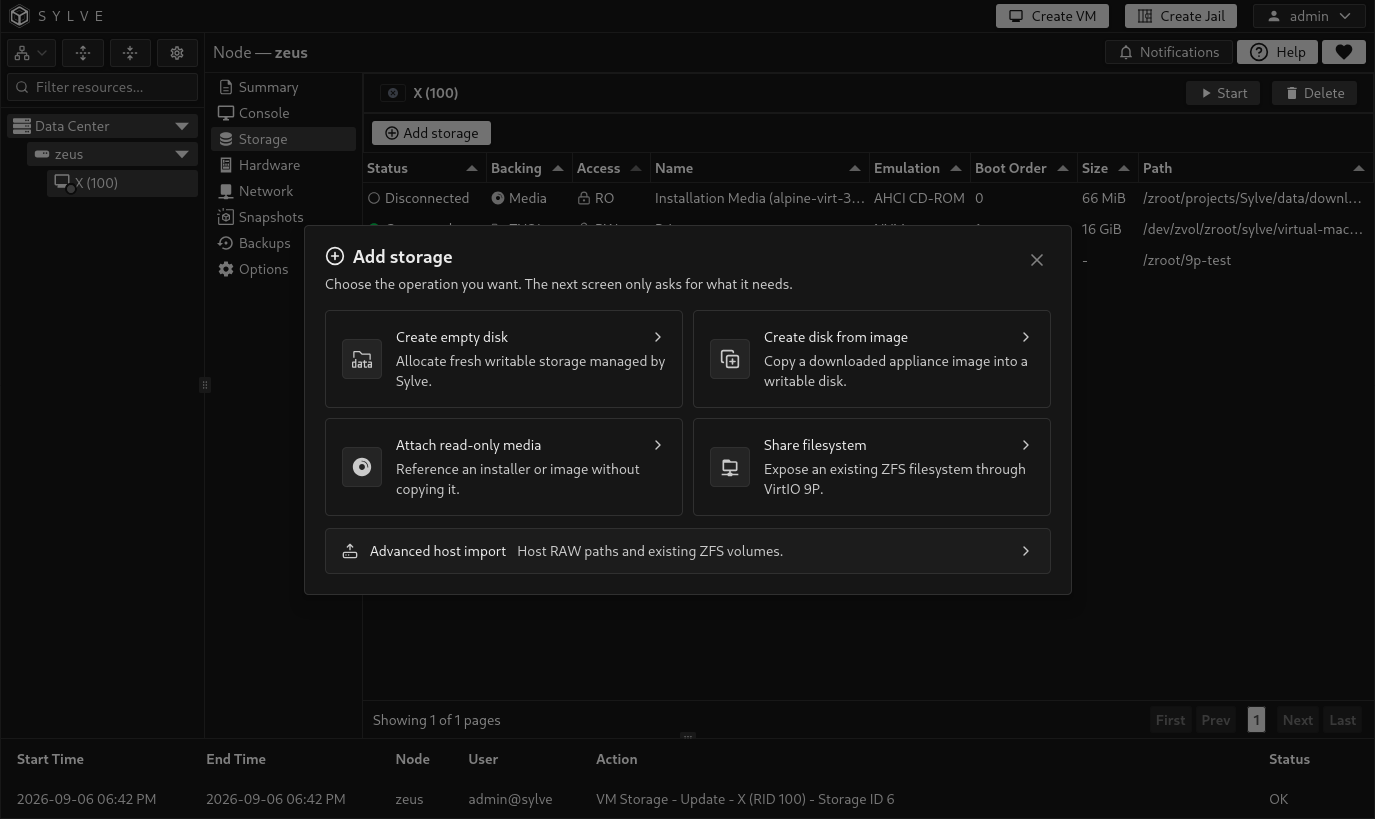
Section titled “Create an empty disk”Choose Create empty disk. Enter a Name and Size, choose Backing and Pool, then select Emulation and an unused Boot order.
Use ZFS Volume for a native ZFS block device or RAW file for a file-backed disk. Sizes accept values such as 64 GiB or an exact byte count. The selected pool must have enough free space.
Select Create disk. Sylve creates and attaches storage under the VM’s managed hierarchy. An empty disk still needs an OS installation or partitioning and formatting inside the guest.
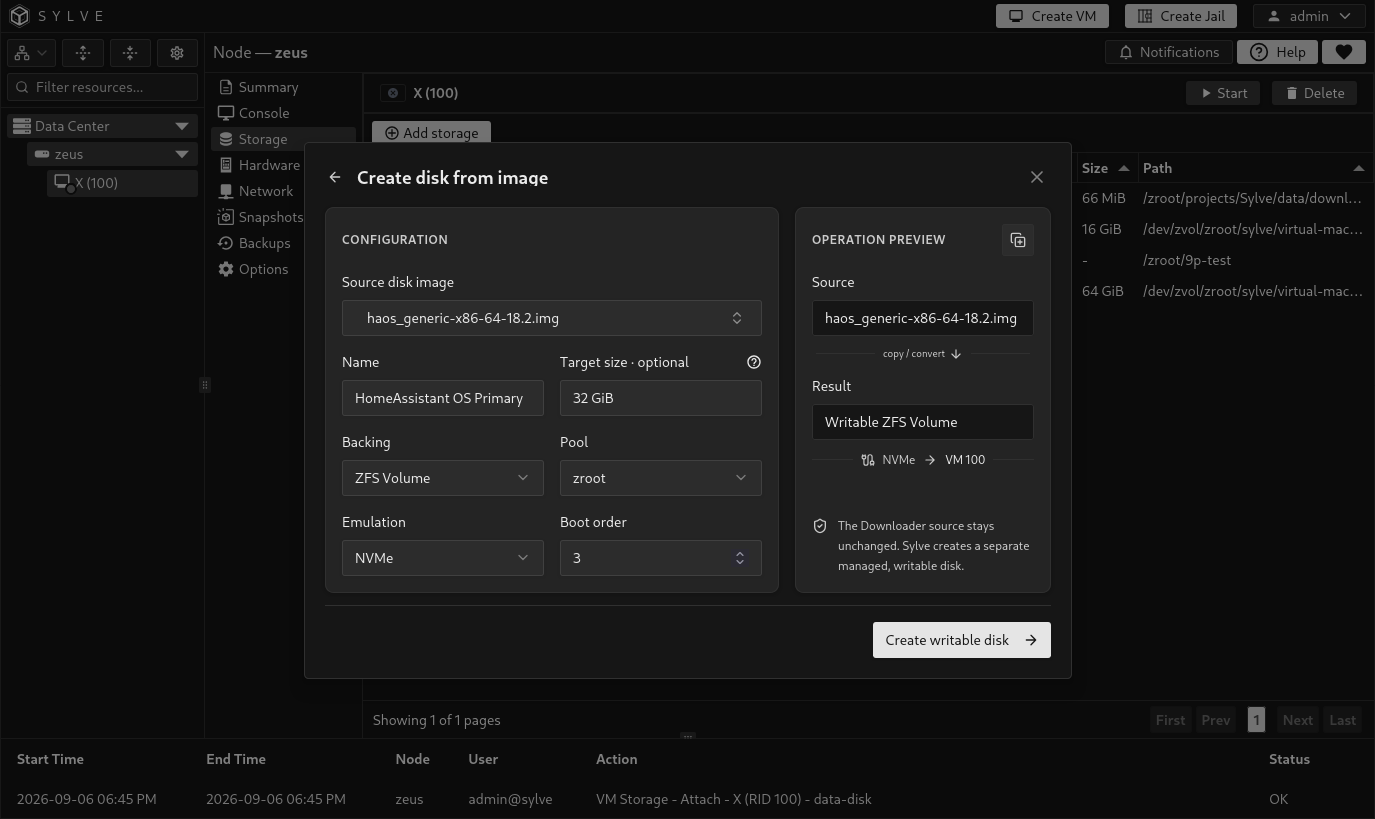
Create a writable disk from an image
Section titled “Create a writable disk from an image”Choose Create disk from image:
- Select a completed download under Source disk image.
- Review the suggested Name.
- Leave Target size · optional empty to use the image’s virtual capacity, or enter a larger capacity.
- Select Backing, Pool, Emulation, and an unused Boot order.
- Review the preview and select Create writable disk.
Sylve copies or converts the image into a separate managed ZFS volume or RAW file. The Downloader source stays unchanged and can be reused. The target cannot be smaller than the image’s virtual capacity. A larger target does not automatically expand partitions or filesystems inside the guest.
Installer ISOs must use Attach read-only media. Images that depend on an external backing file are rejected; prepare a self-contained disk image first. Compressed images must be extracted before selection. If no compatible downloads appear, add or process the image in Downloader and wait for Done. Compressed torrent images must be extracted externally and added to Downloader by host path.
Keep the dialog open while the disk is being copied and wait for completion before starting the VM.
Attach read-only media
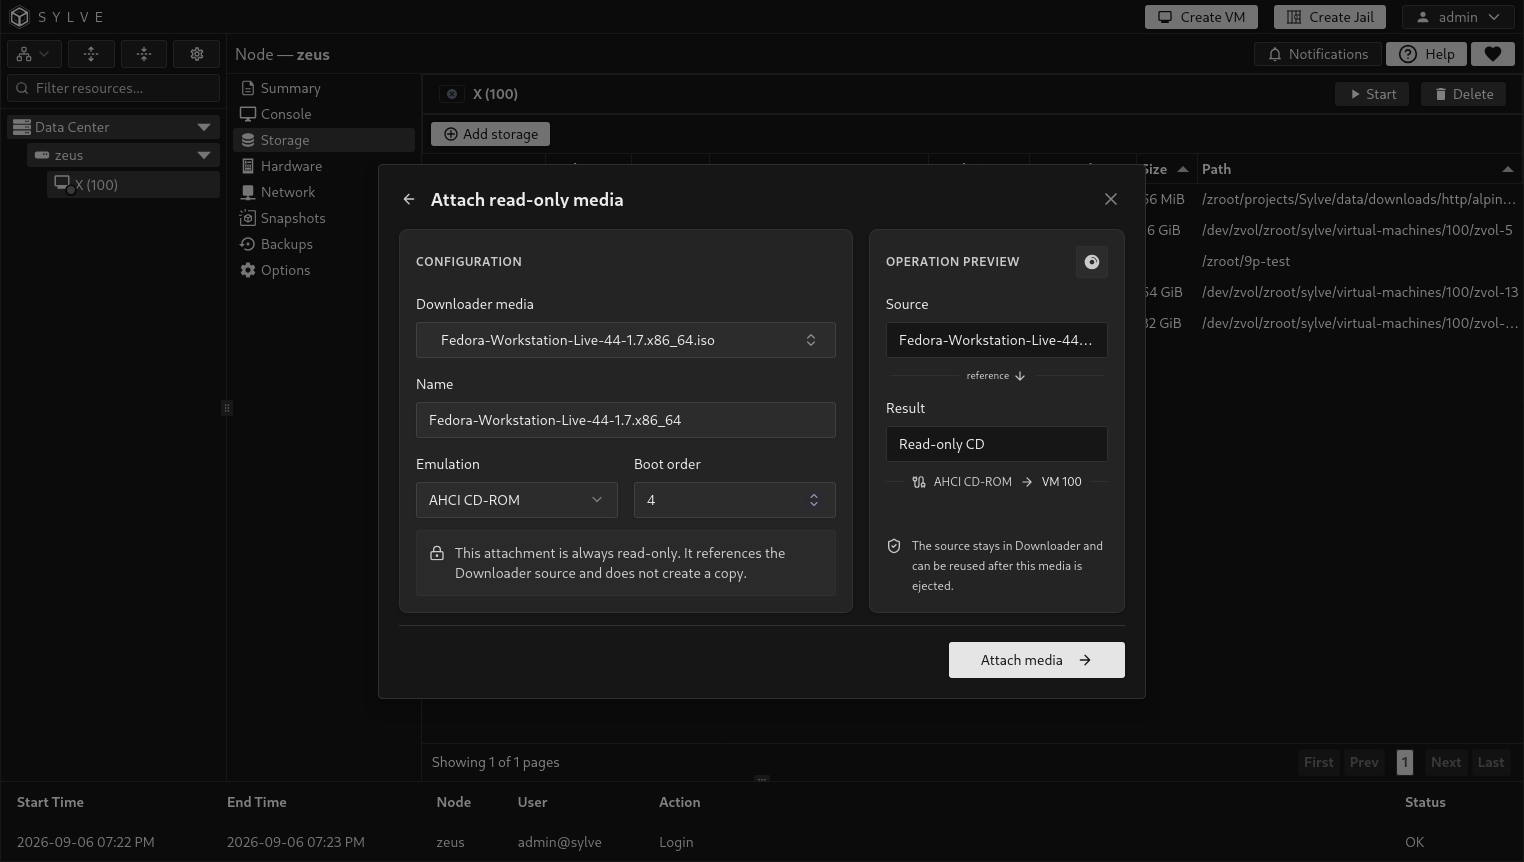
Section titled “Attach read-only media”Choose Attach read-only media, select Downloader media, enter a Name, and review Emulation and Boot order. Select Attach media.
This references the source directly without creating a writable copy. ISO media uses AHCI CD-ROM. A supported disk image can use a disk emulation, but this attachment remains read-only. Use Create disk from image when the guest needs to write to the disk.
Share a filesystem with 9P
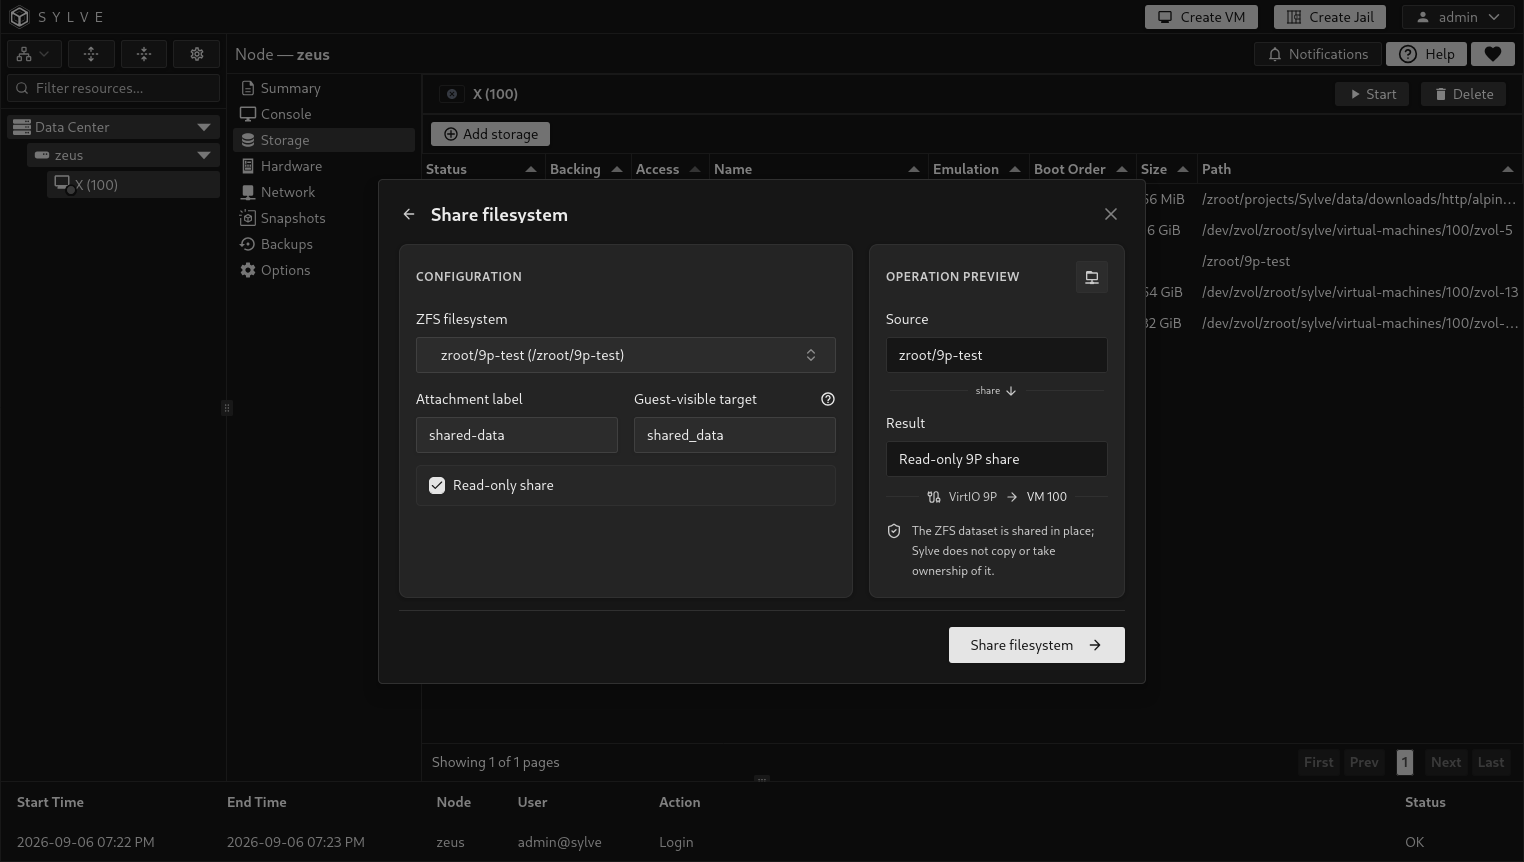
Section titled “Share a filesystem with 9P”Choose Share filesystem, select the ZFS filesystem, and enter an Attachment label and Guest-visible target. The target identifies the share inside the guest. It must be unique within the VM, begin with a letter or number, and contain only letters, numbers, periods, underscores, and hyphens.
Enable Read-only share when the VM must not modify files. It is disabled by default. Select Share filesystem to expose the mounted host filesystem through VirtIO 9P. Sylve shares the dataset in place without copying it or taking ownership of it. The guest needs a compatible 9P client and its own mount configuration.
A filesystem share is not a boot disk and has no boot order.
Import existing host storage
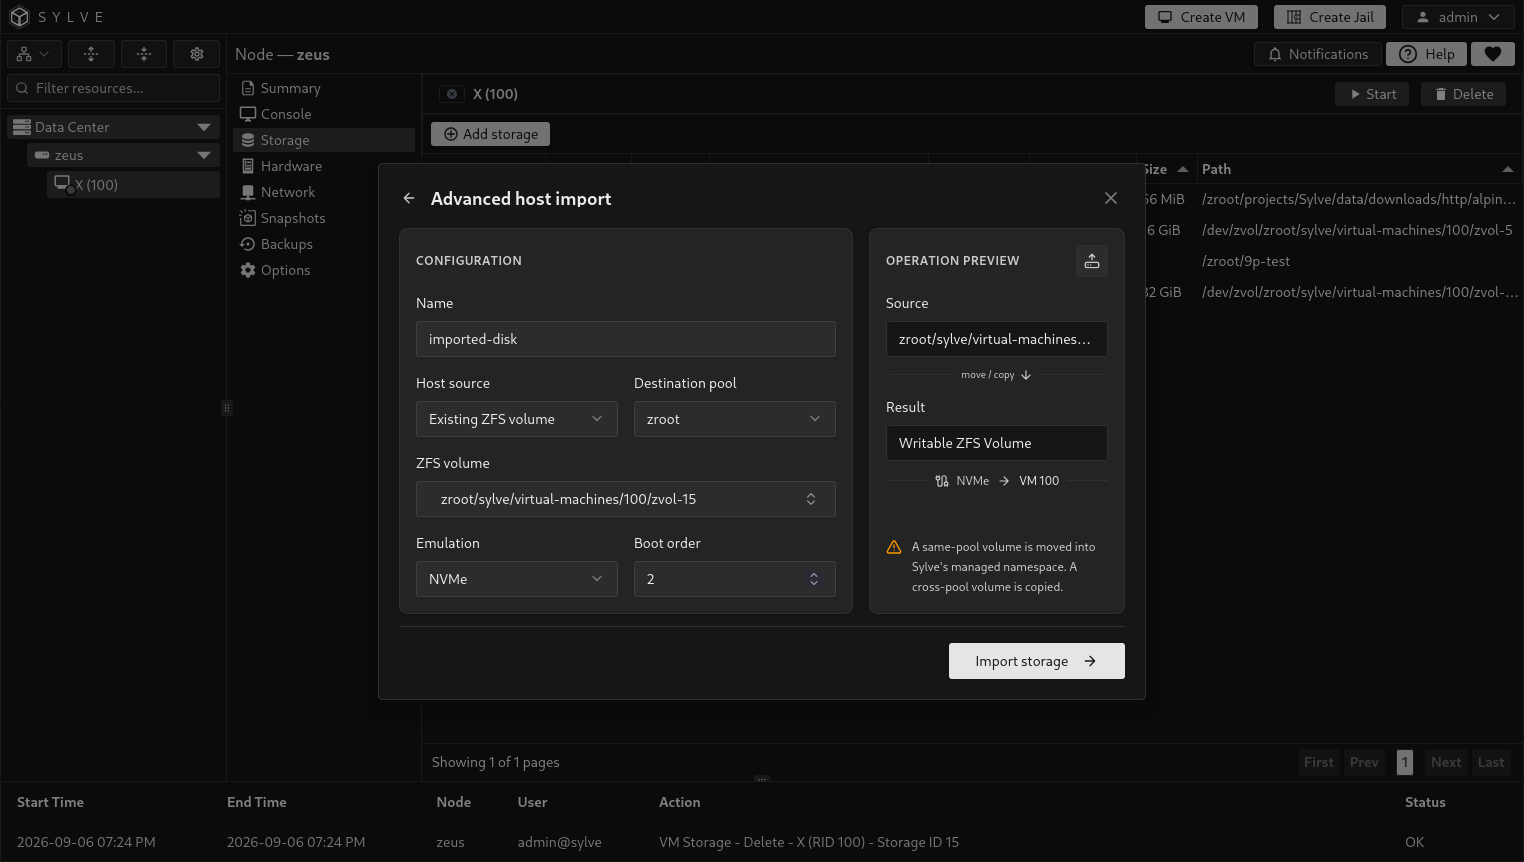
Section titled “Import existing host storage”Choose Advanced host import, enter a Name, and select Host source:
| Host source | Fields and result |
|---|---|
| Regular RAW file | Enter an Absolute host path to a regular RAW file and choose a Destination pool. Sylve copies the file into managed storage and leaves the source in place. |
| Existing ZFS volume | Select an unattached ZFS volume and a Destination pool. A same-pool volume is moved into the VM’s managed namespace. A cross-pool volume is copied through ZFS snapshot transfer. |
Choose Emulation and an unused Boot order, review the preview, then select Import storage. For downloaded images needing format conversion, use Create disk from image.
Choose emulation and boot order
Section titled “Choose emulation and boot order”| Emulation | Use it for |
|---|---|
| NVMe | Modern guests with NVMe support. The initial choice for new writable disks. |
| VirtIO Block | Guests with VirtIO block drivers. |
| AHCI Hard Disk | SATA-style disk compatibility. |
| AHCI CD-ROM | Read-only optical media. |
| VirtIO 9P | Filesystem shares. Sylve selects it automatically. |
Boot order must be a unique non-negative value among the VM’s block disks and media. Lower values appear earlier in Sylve’s generated device order. Filesystem shares have no boot order.
Edit storage
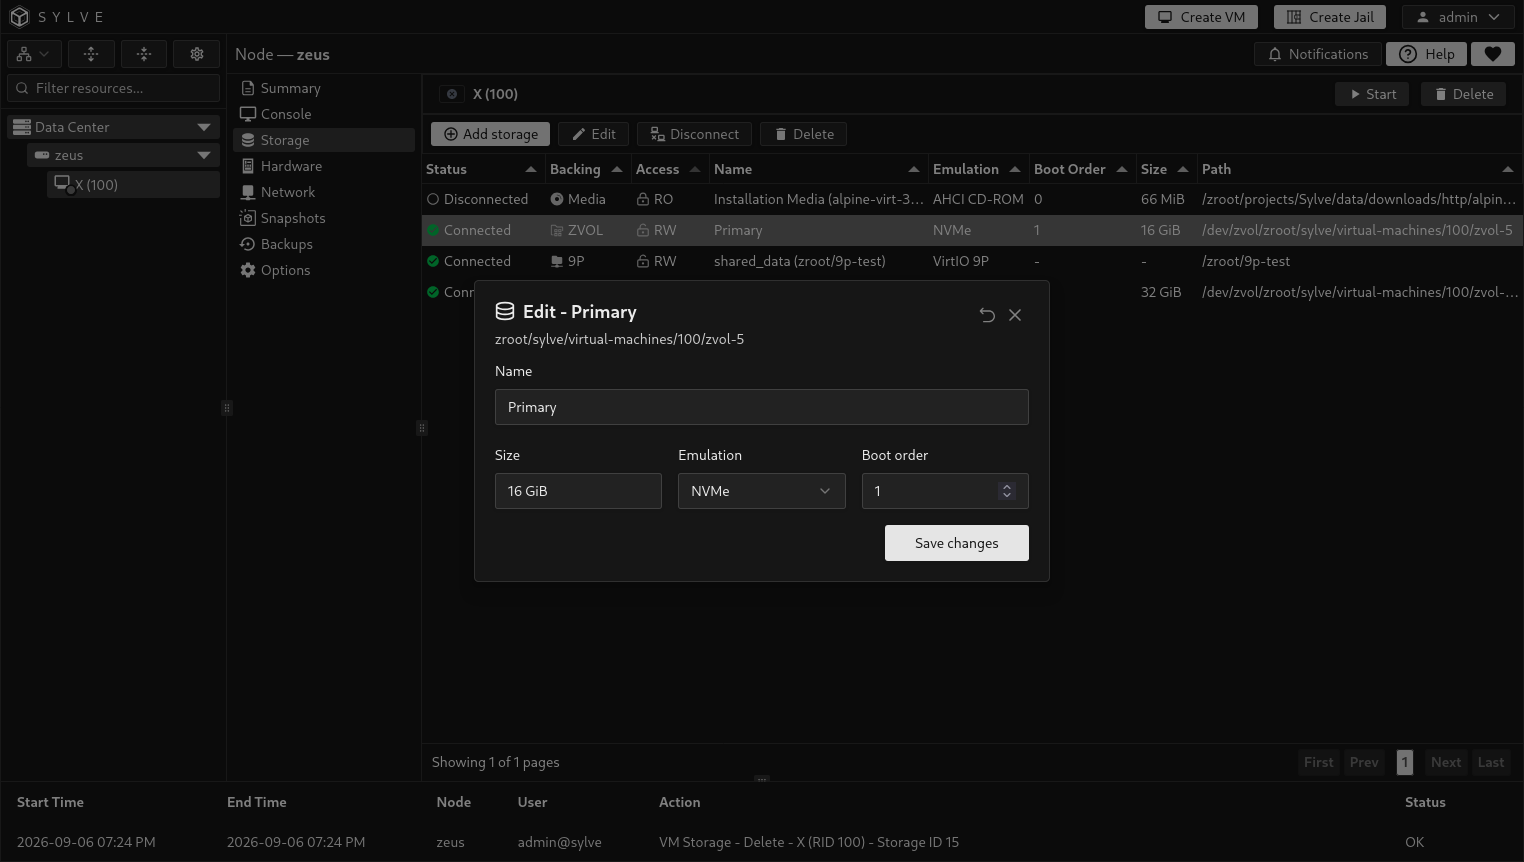
Section titled “Edit storage”Select a row and choose Edit. Managed disks allow changes to name, size, emulation, and boot order. Disks can grow but cannot shrink. Growing a disk does not automatically grow guest partitions or filesystems.
Media size is read-only. A filesystem share’s editor shows its dataset and lets you change its name, 9P target name, and Read-only share setting. Select Save changes when finished. Connection state is controlled through the table actions below.
Connect, eject, or unshare
Section titled “Connect, eject, or unshare”Select a row to show the action appropriate to its backing:
| Attachment | Disconnect action | Reconnect action |
|---|---|---|
| ZVOL or RAW disk | Disconnect | Connect |
| Downloader media | Eject | Insert |
| 9P filesystem share | Unshare | Share |
These actions retain the attachment and underlying data. Disconnected storage is omitted from the VM’s device configuration until reconnected. The VM must be shut off for either action.
After installing an operating system, shut the VM off, select its installer media, and choose Eject. This prevents the next boot from returning to the installer. The media row remains available for Insert later, and the source stays in Downloader.
Delete storage
Section titled “Delete storage”Select a row and choose Delete to remove the attachment and its saved configuration from the VM.
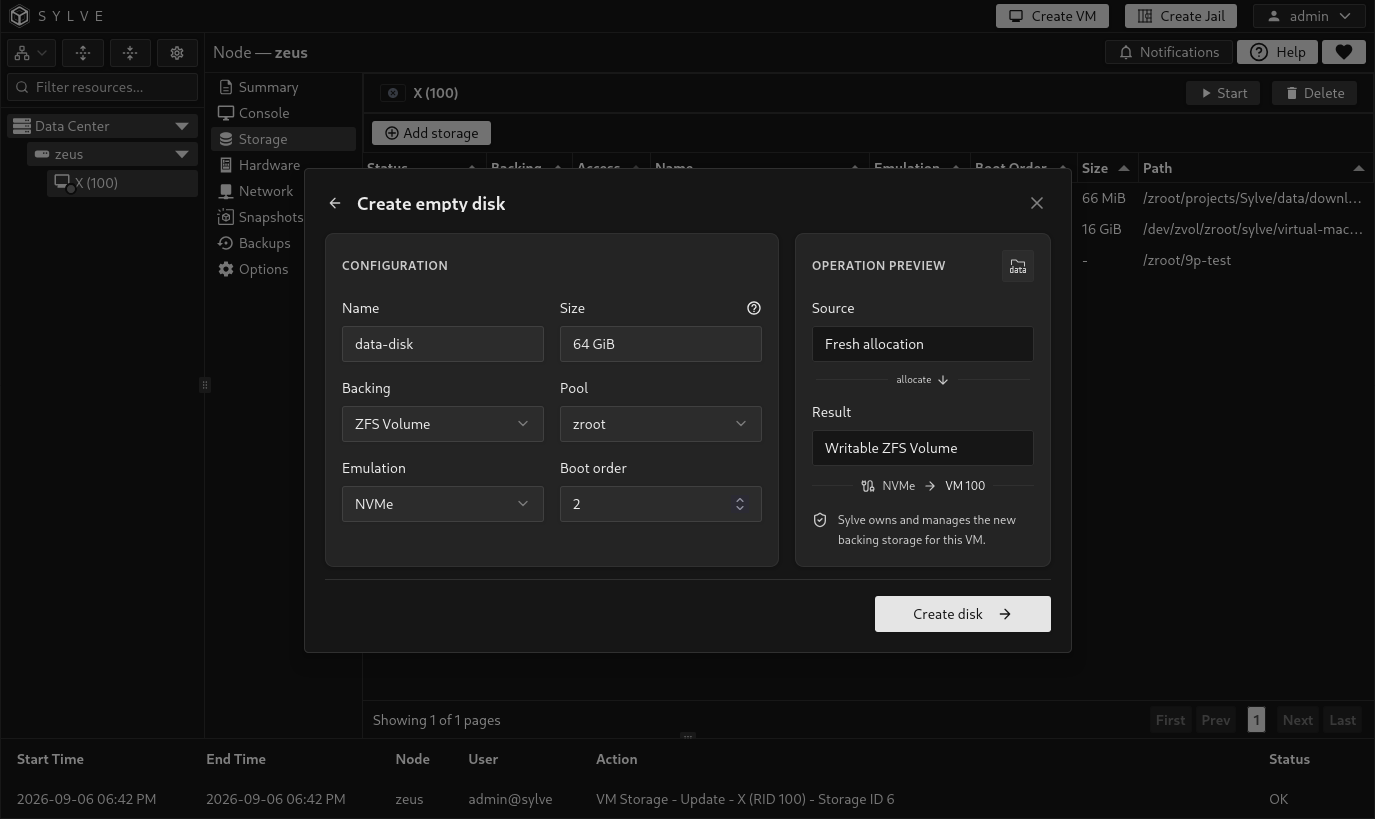
By default, backing data remains on the host. For managed RAW disks and ZFS volumes, the confirmation also offers Also permanently delete backing storage, initially unchecked. Enable it only when you want to destroy the disk and its data, then select Delete storage and backing. Sylve validates that the backing belongs to that managed VM attachment before deleting it.
This option is unavailable for Downloader media and 9P shares. Their source download or shared ZFS dataset remains after attachment deletion.
The example below shows permanent backing deletion selected.