

Import a VMware VM
This guide imports an existing VMware virtual machine into Sylve. It uses an Alpine Linux VM with a split VMDK as the example, but the same workflow applies to many Linux and BSD guests.
The process moves the virtual disk and recreates the virtual hardware. VMware configuration, snapshots, suspended memory, and NVRAM are not imported automatically.
Prepare Sylve and host networking
Section titled “Prepare Sylve and host networking”Follow Simple Virtual Machine through Create a Standard Switch. This installs and initializes Sylve, enables Virtualization, and creates the network switch used by the imported VM.
Stop before Download the Debian installer. This migration uses the existing VMware disk instead of an installer ISO.
Understand the VMware files
Section titled “Understand the VMware files”A VMware directory can contain configuration, firmware state, logs, snapshots, and one or more virtual-disk files. The example directory contains:
hayzam-pc :: ~/vmware/Alpine » ls -lhtotal 252M-rw-rw-r-- 1 hayzam hayzam 7.7K Aug 24 13:10 Alpine-0.scoreboard-rw------- 1 hayzam hayzam 265K Aug 24 13:12 Alpine.nvram-rw------- 1 hayzam hayzam 7.0M Aug 24 13:12 Alpine-s001.vmdk-rw------- 1 hayzam hayzam 124M Aug 24 13:12 Alpine-s002.vmdk-rw------- 1 hayzam hayzam 128K Aug 24 13:12 Alpine-s003.vmdk-rw-rw-r-- 1 hayzam hayzam 7.9K Aug 24 13:12 Alpine.scoreboard-rw------- 1 hayzam hayzam 536 Aug 24 13:11 Alpine.vmdk-rw-r--r-- 1 hayzam hayzam 0 Aug 24 13:10 Alpine.vmsd-rwxr-xr-x 1 hayzam hayzam 2.6K Aug 24 13:12 Alpine.vmx-rw-r--r-- 1 hayzam hayzam 261 Aug 24 13:10 Alpine.vmxf-rw-r--r-- 1 hayzam hayzam 180K Aug 24 13:10 vmware-0.log-rw-r--r-- 1 hayzam hayzam 218K Aug 24 13:12 vmware.loghayzam-pc :: ~/vmware/Alpine »| File | Purpose |
|---|---|
Alpine.vmx |
Describes the VMware virtual hardware, including firmware, CPU, memory, disks, and network adapters. Use it as a reference when recreating the VM in Sylve. |
Alpine.nvram |
Contains VMware firmware state and stored UEFI variables. Sylve does not import this file and creates new UEFI variable storage instead. |
Alpine.vmdk |
Small disk descriptor that records the disk geometry and references the split extent files. Use this descriptor as the qemu-img conversion source. |
Alpine-s001.vmdk and later |
Hold the actual virtual-disk data. Keep every referenced extent beside Alpine.vmdk while converting it. |
Do not upload or convert only an extent such as Alpine-s001.vmdk. Run conversion against the descriptor, Alpine.vmdk, while every referenced extent remains beside it.
Prepare the VMware VM
Section titled “Prepare the VMware VM”Before conversion:
- Shut the guest operating system down cleanly.
- Confirm that VMware shows the VM as powered off, not suspended.
- Delete or consolidate VMware snapshots so the descriptor represents the state you intend to migrate.
- Copy the complete VM directory to a safe working location.
- Do not start the original VM again after the final conversion if both systems could use the same identity, addresses, or application data.
A scoreboard or lock file left by a running VMware process is a sign that the source may still be in use. Close VMware and confirm that the VM is fully stopped before continuing.
Record the original configuration
Section titled “Record the original configuration”Inspect the settings that must be recreated in Sylve:
hayzam-pc :: ~/vmware/Alpine » grep -E '^(firmware|memsize|numvcpus|ethernet0\.virtualDev|ethernet0\.addressType|ethernet0\.address|scsi0\.virtualDev|(scsi|sata|ide|nvme)[0-9]+:[0-9]+\.fileName)' Alpine.vmxnumvcpus = "4"memsize = "4096"nvme0:0.fileName = "Alpine.vmdk"sata0:1.fileName = "/home/hayzam/Downloads/alpine-virt-3.24.1-x86_64.iso"ethernet0.addressType = "generated"ethernet0.virtualDev = "e1000"firmware = "efi"hayzam-pc :: ~/vmware/Alpine »Interpret the example before recreating its hardware:
| Result | Meaning for the Sylve VM |
|---|---|
numvcpus = "4" |
Recreate four vCPUs. A simple layout is one socket, four cores, and one thread per core. |
memsize = "4096" |
Allocate 4 GiB of memory. |
nvme0:0.fileName = "Alpine.vmdk" |
Alpine.vmdk is the active boot-disk descriptor to convert. |
sata0:1.fileName = "...alpine-virt-3.24.1-x86_64.iso" |
VMware still has an installer ISO attached. It is not part of the boot-disk conversion and does not need to be imported. |
ethernet0.addressType = "generated" |
VMware generated the MAC address, so Sylve can generate a new managed MAC unless the guest configuration depends on the old value. |
ethernet0.virtualDev = "e1000" |
Use E1000 for the first Sylve boot to minimize network-driver changes. |
No firmware = "efi" result |
Treat the source as a legacy BIOS guest until its boot mode is verified. It will need conversion to UEFI before import. |
Convert the split VMDK
Section titled “Convert the split VMDK”Install qemu-img on the computer holding the VMware directory. On Debian or Ubuntu it is provided by qemu-utils. Other operating systems may package it under a different name.
From the directory containing the descriptor and every extent, run qemu-img info Alpine.vmdk to inspect the active disk. Substitute the descriptor recorded from Alpine.vmx if it differs:
hayzam-pc :: ~/vmware/Alpine » qemu-img info Alpine.vmdkimage: Alpine.vmdkfile format: vmdkvirtual size: 8 GiB (8589934592 bytes)disk size: 251 MiBcluster_size: 65536Format specific information: cid: 2583358334 parent cid: 4294967295 create type: twoGbMaxExtentSparse extents: [0]: virtual size: 4261412864 filename: Alpine-s001.vmdk cluster size: 65536 format: SPARSE [1]: virtual size: 4261412864 filename: Alpine-s002.vmdk cluster size: 65536 format: SPARSE [2]: virtual size: 67108864 filename: Alpine-s003.vmdk cluster size: 65536 format: SPARSEChild node '/extents.2': filename: Alpine-s003.vmdk protocol type: file file length: 128 KiB (131072 bytes) disk size: 50.1 MiBChild node '/extents.1': filename: Alpine-s002.vmdk protocol type: file file length: 124 MiB (129957888 bytes) disk size: 150 MiBChild node '/extents.0': filename: Alpine-s001.vmdk protocol type: file file length: 7 MiB (7340032 bytes) disk size: 50.5 MiBChild node '/file': filename: Alpine.vmdk protocol type: file file length: 1 KiB (1024 bytes) disk size: 4 KiBhayzam-pc :: ~/vmware/Alpine »This confirms that Alpine.vmdk is a split sparse disk backed by all three extent files. Its current VMware data occupies about 251 MiB, but its virtual size is 8 GiB. The converted RAW file therefore has an 8 GiB logical size, and the browser upload processes the full 8 GiB.
Note the virtual size. It determines the logical size that the browser must upload and the space required for the managed RAW disk copy.
Convert the descriptor and its referenced extents into one RAW disk:
hayzam-pc :: ~/vmware/Alpine » qemu-img convert -p -f vmdk -O raw Alpine.vmdk Alpine.raw (100.00/100%)hayzam-pc :: ~/vmware/Alpine »The -p option shows progress. -f vmdk identifies the source format, and -O raw creates the format required by the Regular RAW file option in Advanced host import.
Verify the result by running qemu-img info Alpine.raw:
hayzam-pc :: ~/vmware/Alpine » qemu-img info Alpine.rawimage: Alpine.rawfile format: rawvirtual size: 8 GiB (8589934592 bytes)disk size: 127 MiBChild node '/file': filename: Alpine.raw protocol type: file file length: 8 GiB (8589934592 bytes) disk size: 127 MiBhayzam-pc :: ~/vmware/Alpine »The RAW file’s apparent size matches the complete virtual disk even when the file is sparse. Keep Alpine.raw until the imported VM has been verified.
Create a temporary import dataset
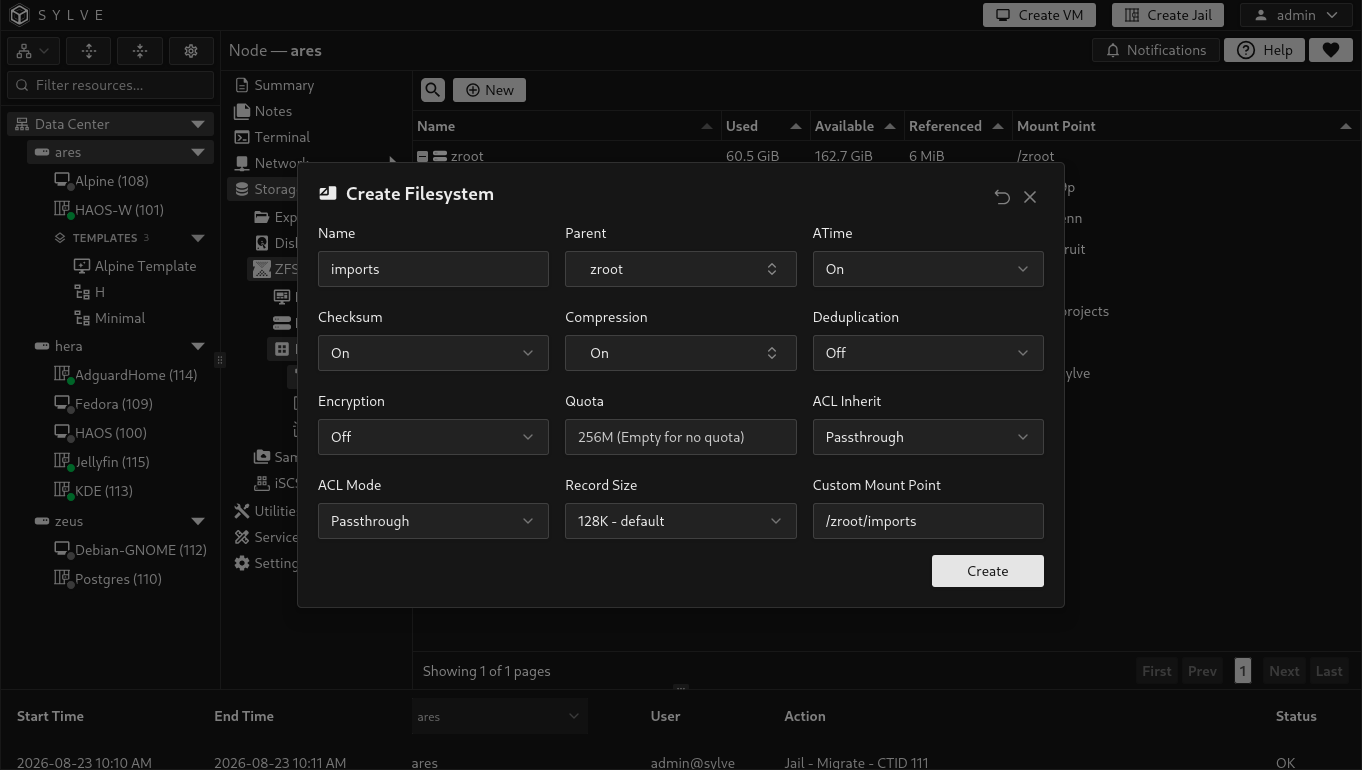
Section titled “Create a temporary import dataset”Open Storage → ZFS → Datasets → File Systems and select New. Create a temporary filesystem named imports beneath zroot. Keep the default storage properties and leave Quota empty. If you set a quota, it must be larger than the RAW disk’s 8 GiB logical size and leave enough room for the upload.
This guide assumes its mountpoint is:
/zroot/importsSet Custom Mount Point to /zroot/imports. Use the actual mountpoint shown by Sylve when your pool is mounted somewhere else. The path must be absolute because Advanced host import reads an existing regular file from the node.
Upload the RAW disk with File Explorer
Section titled “Upload the RAW disk with File Explorer”Open Storage → Explorer. File Explorer starts in the root directory, /, by default. For this example, first open zroot, then open imports to reach /zroot/imports. If you used a different custom mountpoint, navigate to that location instead.
Select Add New then Upload File and upload Alpine.raw.
Wait for the browser upload to complete before closing the upload dialog. Then confirm that /zroot/imports/Alpine.raw appears in File Explorer.
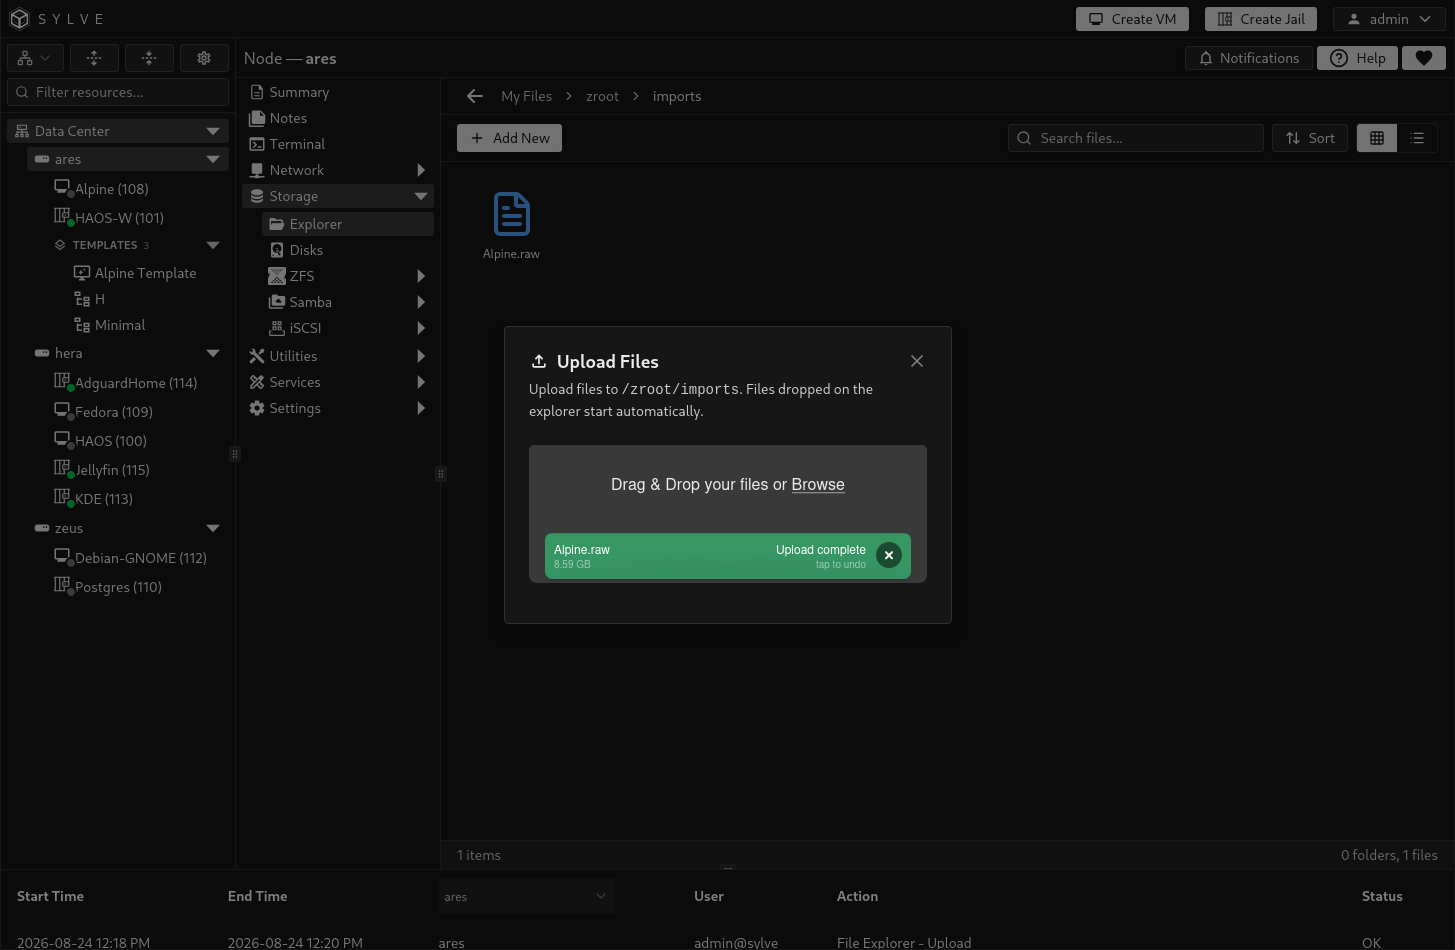
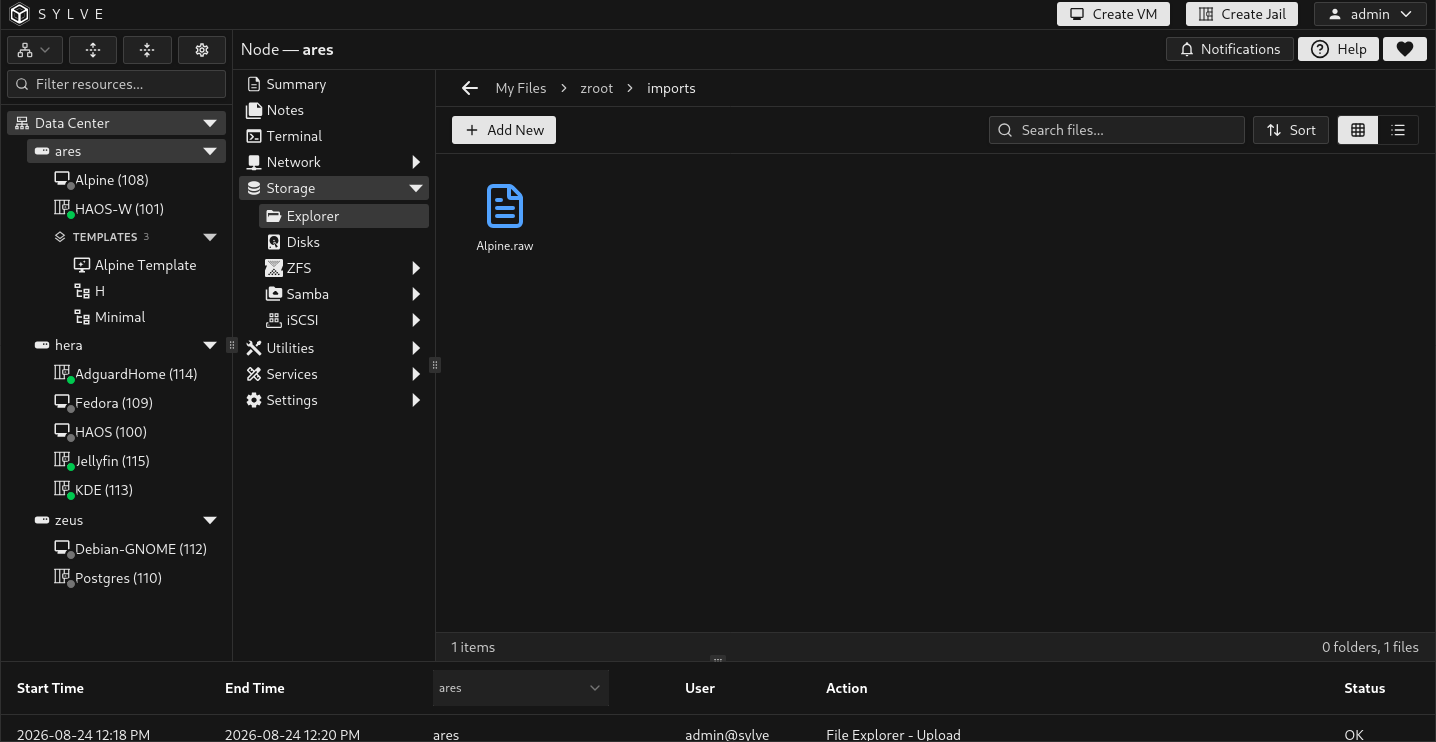
The uploaded RAW file and its managed copy coexist temporarily because Sylve copies the source into managed VM storage. Allow free space for both complete files before starting.
Create the VM definition
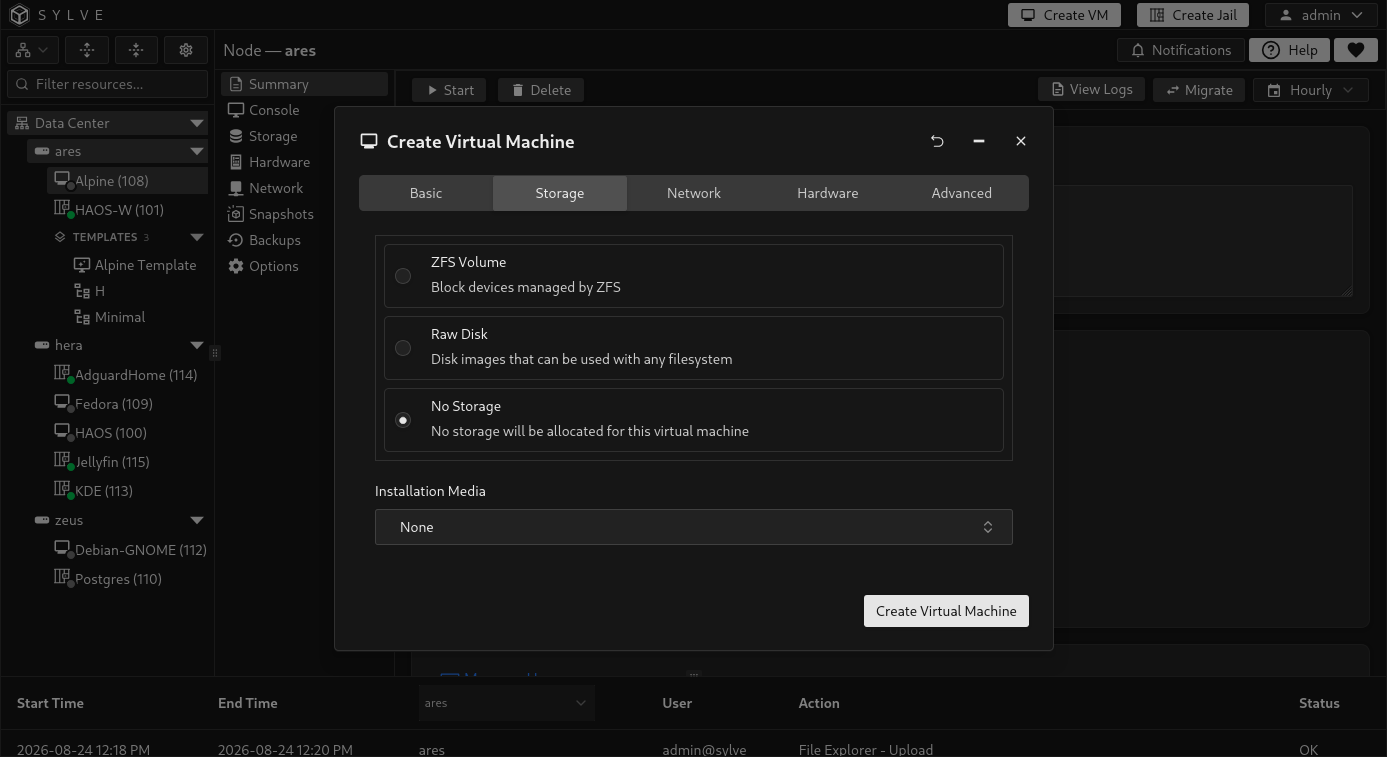
Section titled “Create the VM definition”Click on Create VM that’s present on the top-right.
Choose an unused VM ID and use a clear name such as Alpine. Add a description noting that the VM was imported from VMware.
Storage
Section titled “Storage”Set Storage Type to No Storage and leave Installation Media set to None. The uploaded RAW disk will be imported after the VM definition exists.
Network
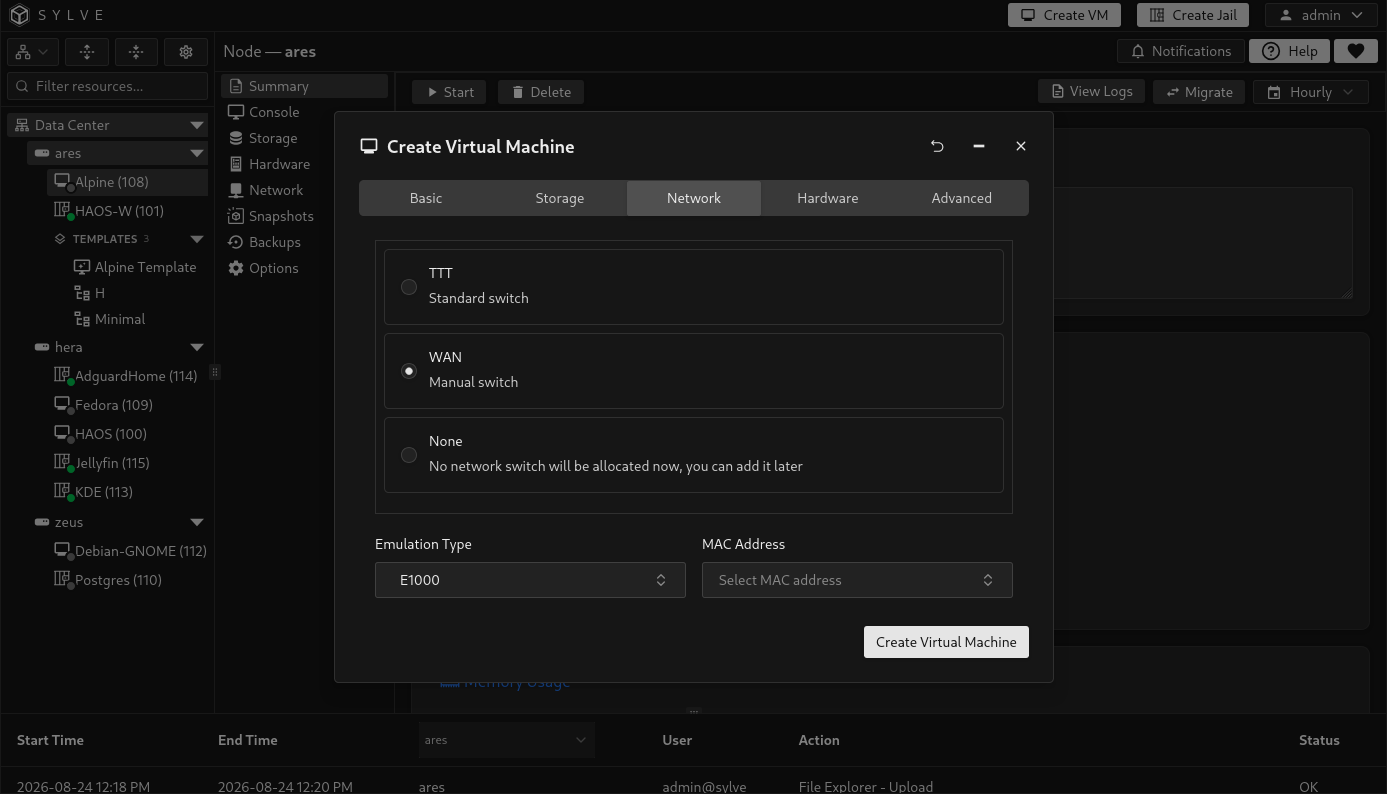
Section titled “Network”Attach the VM to the switch that provides the required guest network. Select the Standard Switch created earlier when following this guide exactly. The example screenshot instead uses an existing Manual Switch named WAN.
Use E1000 for the first boot when broad compatibility is more important than performance. Use VirtIO when the guest already has VirtIO network support. Alpine Linux normally supports VirtIO, but changing both hypervisor and device model at once can complicate troubleshooting.
Leave MAC Address empty so Sylve generates a managed address. Reuse the VMware MAC only when the guest or surrounding network deliberately depends on it, and never run the original and imported VM on the same network with the same MAC.
Hardware
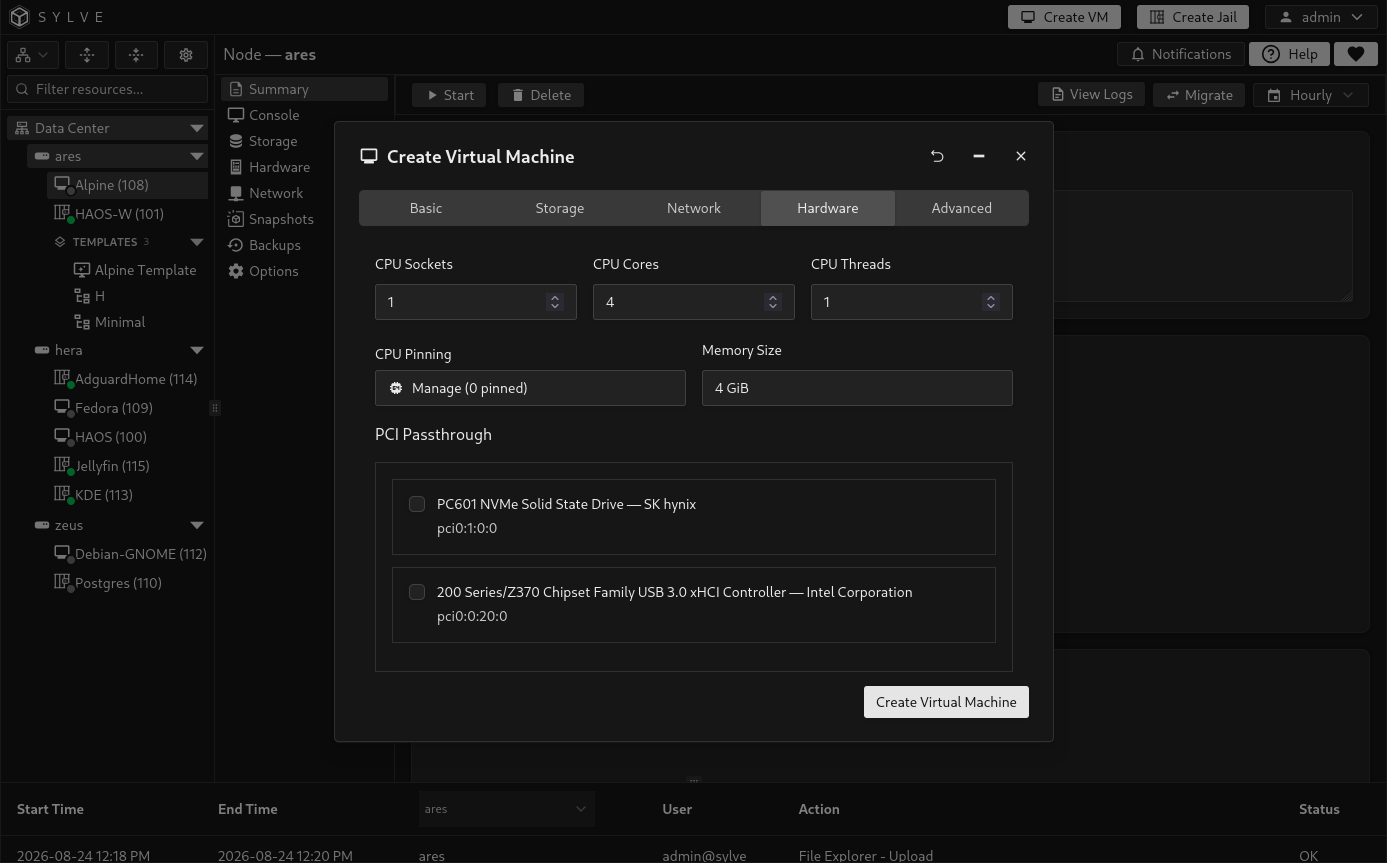
Section titled “Hardware”Recreate the source VM’s vCPU count and memory using the values recorded from Alpine.vmx. A simple topology of one socket, the required number of cores, and one thread per core is suitable unless the guest licensing or workload requires another layout.
Do not copy VMware PCI assignments. Configure Sylve PCI passthrough separately only after the imported VM works without it.
Advanced
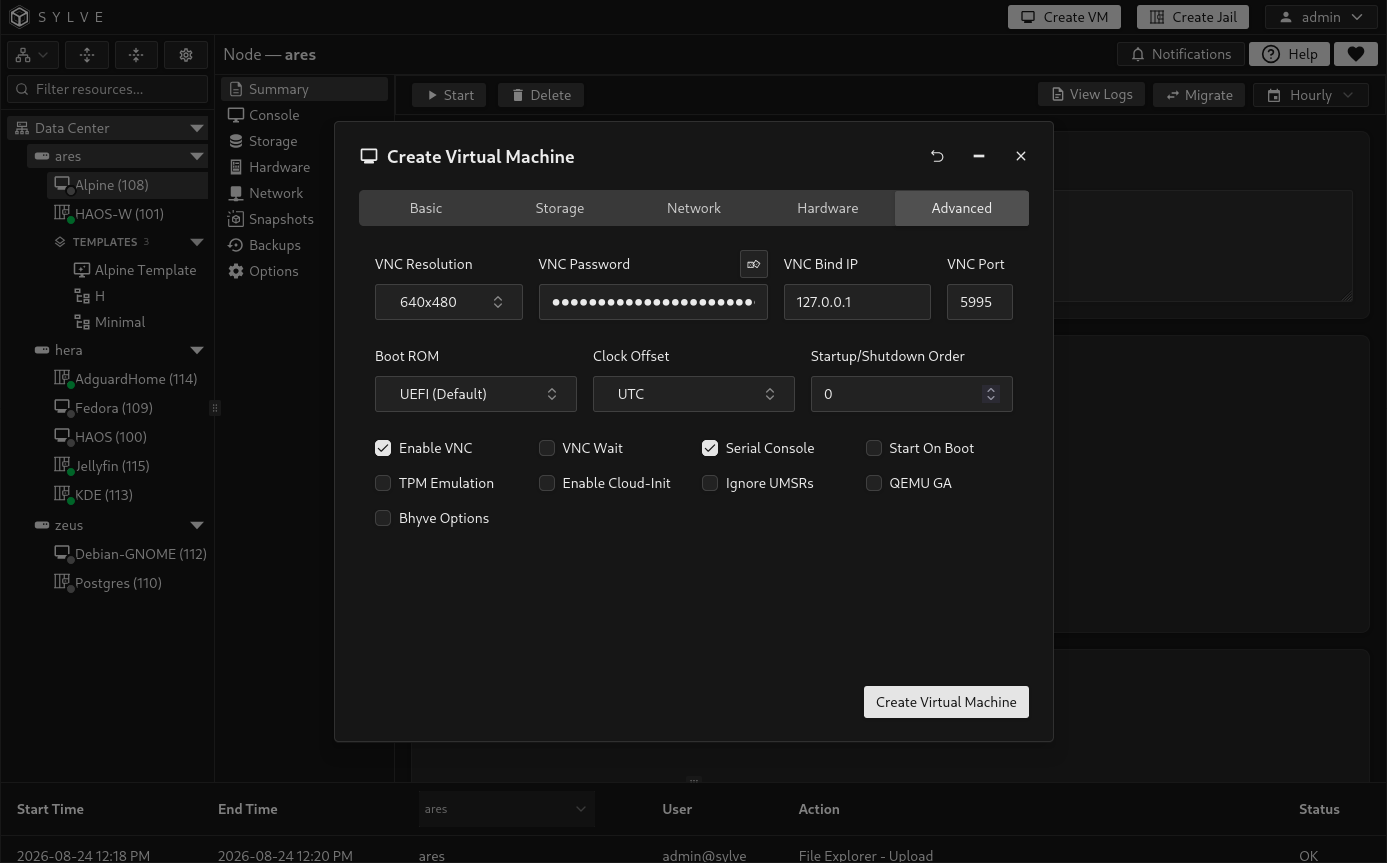
Section titled “Advanced”Enable VNC for the first boot so firmware and bootloader errors remain visible.
Choose UEFI when the VMware configuration contains firmware = "efi". VMware’s Alpine.nvram is not imported, so Sylve creates fresh UEFI variable storage. The guest should provide a fallback EFI loader such as EFI/BOOT/BOOTX64.EFI, or its boot entry may need repair.
Keep QEMU GA disabled until the QEMU Guest Agent is installed and enabled inside the guest. Configure Start On Boot only after the migration has been tested.
Keep Serial Console enabled, especially for Linux and/or BSD guests that may not have a graphical console. It provides an alternative to VNC for troubleshooting boot failures.
Select Create and wait for the empty VM definition to appear.
Import the RAW boot disk
Section titled “Import the RAW boot disk”Keep the VM shut off. Open its Storage page, select Add storage, and choose Advanced host import.
Configure the attachment:
- Name:
From VMware - Host source: Regular RAW file
- Absolute host path:
/zroot/imports/Alpine.raw, or the actual absolute upload path - Destination pool:
zroot, or the pool that will hold the VM’s managed storage - Emulation: AHCI Hard Disk for the first compatibility-oriented boot
- Boot order:
0, which is available because this VM has no other disks or media
Review Operation preview and confirm that it describes copying the host RAW file into managed storage. Select Import storage. Sylve verifies that the source is a regular file, copies it into the VM’s managed raw-disk location, and leaves the uploaded source file unchanged. Keep the dialog open and wait for completion before starting the VM.

Confirm that the imported disk appears with Status set to Connected, Backing set to RAW, and Access set to RW. For this example, check the name From VMware, size 8 GiB, emulation AHCI Hard Disk, and boot order 0. The Path should point to the VM’s managed disk, not /zroot/imports/Alpine.raw.
Connected means the disk is included in the VM’s configuration. It does not mean the VM is running. For other attachment options, see VM Storage.

Perform the first boot
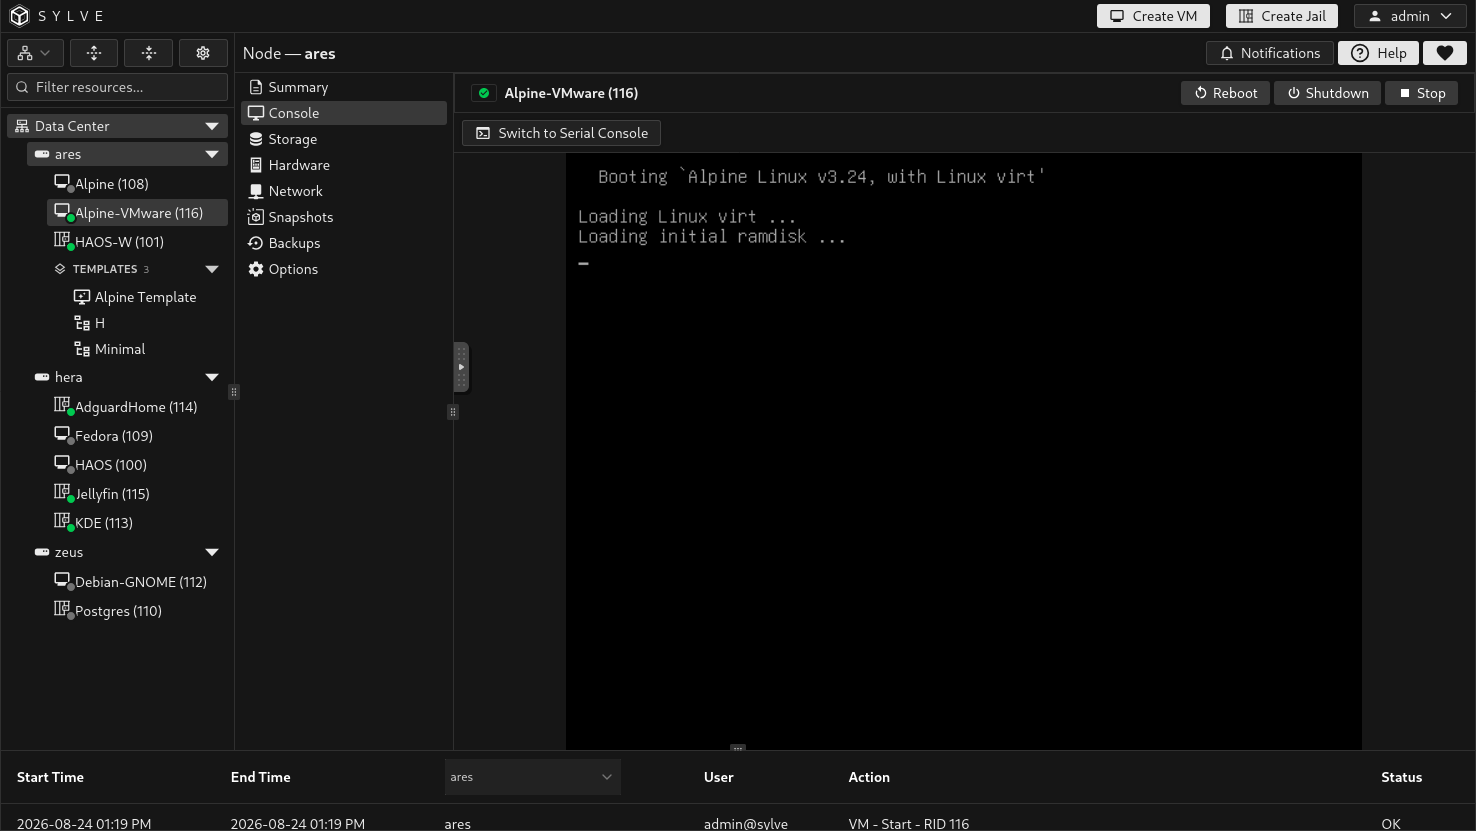
Section titled “Perform the first boot”Open Console, then start the VM. Watch the firmware and guest boot process rather than assuming a successful Start action means the operating system booted.
Use the serial console for Alpine
Section titled “Use the serial console for Alpine”Alpine may continue booting even when VNC remains at Loading initial ramdisk. VMware provides its own virtual graphics adapter, but Bhyve does not emulate that device. After Linux takes control from the UEFI framebuffer, the imported guest may therefore stop updating VNC.
The normal first boot reaches an Alpine GRUB menu containing the Linux entry and UEFI Firmware Settings. Its timeout is short, so press an arrow key repeatedly as the VM starts to pause the menu. Highlight the Alpine Linux entry and press e. Find the line beginning with linux, remove quiet, and add the following parameters:
console=tty0 console=ttyS0,115200n8Press Ctrl+X or F10 to boot, then select Switch to Serial Console in Sylve. The serial output should show the root filesystem mounting, OpenRC starting, and the address received by the guest.
Kernel output does not provide an interactive login by itself. If SSH is available, connect to the address shown by DHCP. If you need to recover a forgotten root password, edit the GRUB entry again and also append init=/bin/sh. At the serial root shell, run:
mount -o remount,rw /passwdgrep -q '^ttyS0:' /etc/inittab || \ echo 'ttyS0::respawn:/sbin/getty -L 115200 ttyS0 vt100' >> /etc/inittabsyncexec /sbin/initThe init=/bin/sh argument is temporary and applies only to that boot.
Recover the GRUB configuration only if needed
Section titled “Recover the GRUB configuration only if needed”Most UEFI installations reach the normal GRUB menu described above. Use this recovery only if the VM instead stops at a bare grub> prompt. List the detected devices:
lsFor this GPT example, the root filesystem is partition 3. Locate and load its GRUB configuration:
search --no-floppy --file --set=root /boot/grub/grub.cfgecho $rootconfigfile ($root)/boot/grub/grub.cfgThe echo command should report a device such as hd0,gpt3. If the search fails, inspect that partition directly, then load GRUB’s normal mode:
ls (hd0,gpt3)/set root=(hd0,gpt3)set prefix=(hd0,gpt3)/boot/grubinsmod normalnormalThese commands affect only the current boot. After the guest starts, reinstalling the portable UEFI loader with grub-install --removable can repair this specific fallback-loader problem.
Make Alpine’s boot repairs permanent
Section titled “Make Alpine’s boot repairs permanent”After logging in through serial or SSH, add console=tty0 console=ttyS0,115200n8 to GRUB_CMDLINE_LINUX_DEFAULT in /etc/default/grub and remove quiet. Keep the existing root filesystem and storage-module parameters.
Ensure that /etc/inittab contains the serial getty shown above, then regenerate the GRUB configuration:
grub-mkconfig -o /boot/grub/grub.cfgrebootVNC may still stop updating after GRUB. Use VNC for UEFI and GRUB interaction, Serial Console for Alpine boot and recovery, and SSH for routine administration.
Inside Alpine, verify the operating system, disks, and network:
alpine:~# cat /etc/alpine-release3.24.1alpine:~# lsblk-sh: lsblk: not foundalpine:~# ip address1: lo: <LOOPBACK,UP,LOWER_UP> mtu 65536 qdisc noqueue state UNKNOWN qlen 1000 link/loopback 00:00:00:00:00:00 brd 00:00:00:00:00:00 inet 127.0.0.1/8 scope host lo valid_lft forever preferred_lft forever inet6 ::1/128 scope host valid_lft forever preferred_lft forever2: eth0: <BROADCAST,MULTICAST,UP,LOWER_UP> mtu 1500 qdisc pfifo_fast state UP qlen 1000 link/ether 36:da:da:13:b4:76 brd ff:ff:ff:ff:ff:ff inet 10.10.30.244/24 brd 10.10.30.255 scope global eth0 valid_lft forever preferred_lft forever inet6 fd00:10:30:0:34da:daff:fe13:b476/64 scope global dynamic flags 100 valid_lft 5311sec preferred_lft 2611sec inet6 fe80::34da:daff:fe13:b476/64 scope link valid_lft forever preferred_lft foreveralpine:~# ip routedefault via 10.10.30.1 dev eth0 metric 20210.10.30.0/24 dev eth0 scope link src 10.10.30.244alpine:~#If the guest boots but has no network, inspect its interface names and persistent network configuration. VMware and Bhyve may expose different device names or MAC addresses.
After networking works, install and enable the QEMU Guest Agent if desired:
apk add qemu-guest-agentrc-update add qemu-guest-agent defaultShut the guest down, enable QEMU GA in Sylve, and start the VM again. OpenRC will start the agent after the QEMU guest-agent channel becomes available.
Troubleshoot boot failures
Section titled “Troubleshoot boot failures”UEFI cannot find a bootloader
Section titled “UEFI cannot find a bootloader”The VMware NVRAM file is not transferred. Boot from suitable rescue media and reinstall the guest’s EFI bootloader or place its loader at the standard fallback path. Confirm that the EFI System Partition is present before changing it.
The guest was installed for legacy BIOS
Section titled “The guest was installed for legacy BIOS”Sylve does not provide VMware legacy BIOS compatibility. Return to the recoverable source VM and migrate it to UEFI, or use distribution-specific rescue procedures to create an EFI System Partition and install a UEFI bootloader.
The root filesystem is not found
Section titled “The root filesystem is not found”Change the imported disk emulation from AHCI to VirtIO Block or NVMe only when the guest contains the required driver. If the VMware guest depended on a specific SCSI controller, rebuild its initramfs with the Bhyve-visible storage driver before the final conversion.
The RAW disk import fails
Section titled “The RAW disk import fails”Confirm that the source path is absolute, the file exists on the Sylve node, and it is a regular uncompressed RAW file. Also confirm that the destination pool has enough free space for a complete managed copy of the disk. A successful browser upload alone does not reserve space for the later import.
Finish the migration
Section titled “Finish the migration”After the VM boots reliably:
- Verify applications and stored data.
- Confirm time, DNS, routes, and expected network reachability.
- Remove or disable VMware-specific guest tools when they are no longer useful.
- Enable VirtIO devices only after confirming the guest drivers.
- Configure Start On Boot and startup order if required.
- Create a Sylve VM snapshot or backup.
- Delete
/zroot/imports/Alpine.rawthrough File Explorer after confirming that the VM uses its managed copy. - Remove the temporary
importsdataset if it is empty and no longer needed.
Keep the original VMware VM powered off until the imported VM has passed your recovery and application checks.