

Simple Virtual Machine
This guide is written for people starting from absolute zero and walks through the entire process from installation onward. If you have already completed some of the setup, use the page outline on the right to jump directly to the section relevant to you.
This guide requires Sylve 0.3.0 or newer. The screens and workflow described here may not be available in earlier releases.
Install Sylve
Section titled “Install Sylve”On the FreeBSD node, install Sylve from the package repository as root:
pkg install sylveAfter the installation completes, enable Sylve so it starts automatically when FreeBSD boots, then start it now:
service sylve enableservice sylve startOpen https://<your-node-ip>:8181 in a browser. A fresh package installation uses admin as both the username and password. Change these default credentials before exposing the node to an untrusted network. You can follow the account guidance in Getting Started or sign in, open Settings → Authentication → Users → Local, and edit the built-in administrator from the Local Users page.
Confirm the installed version
Section titled “Confirm the installed version”Sign in to the web interface and open the node’s Summary page. Find the Sylve version and confirm that it is 0.3.0 or newer.
You can also check the installed version from the command line:
sylve --versionConfirm that the command reports version 0.3.0 or newer before continuing.
Initialize Sylve for virtual machines
Section titled “Initialize Sylve for virtual machines”Sylve must have its Virtualization service enabled before it can create or manage virtual machines. How you enable it depends on whether the node has already been initialized.
During first-time initialization
Section titled “During first-time initialization”After your first sign-in, Sylve opens the initialization dialog automatically. Select a ZFS pool that Sylve may use, enable Virtualization under Compute, and then select Initialize.
The initialization check verifies the required virtualization packages, confirms that qemu-img is available, and loads the FreeBSD vmm kernel module when needed. Resolve any validation error shown by the dialog before continuing.
For a complete explanation of the first-time setup screen, see Initialization.
On an initialized node
Section titled “On an initialized node”If the node was initialized without virtual-machine support, open Settings → System → Services, select the Virtualization row, and select Enable. Confirm the change when prompted.
After the node returns, sign in again and confirm that Virtualization is shown as enabled under System Services.
Prepare the host networking
Section titled “Prepare the host networking”A virtual machine has a virtual network cable, but that cable still needs a way to reach the physical network. A bridge provides that connection.
Think of a bridge as a small Ethernet switch living inside the FreeBSD host. The node’s physical interface, such as em0, plugs into one side. Virtual interfaces belonging to VMs plug into the other side. The bridge passes network traffic between them, allowing the VMs to communicate with the same network as the host.
In this guide, Sylve will create and manage that bridge as a Standard Switch. It will attach the node’s existing em0 interface as a physical port, then new VMs can attach their virtual interfaces to the same switch.
What this demonstrates: a Standard Switch is a software Ethernet bridge inside the FreeBSD host. It forwards Ethernet frames like a physical switch, while the bridge interface itself can hold the host's IP address. Physical interfaces such as em0 and virtual interfaces such as tap0 occupy its ports.
Your interface may have a different name. Open Network → Interfaces and identify the physical interface that currently provides network access before continuing. Substitute that name wherever this guide uses em0.
Record the current host configuration
Section titled “Record the current host configuration”This guide assumes that em0 is already configured in /etc/rc.conf with either DHCP or a static address. A DHCP configuration commonly looks like this:
ifconfig_em0="DHCP"A static configuration commonly looks like this:
ifconfig_em0="inet 192.168.1.10/24"defaultrouter="192.168.1.1"Use the values already assigned to your node. Do not copy the example address unless it matches your network.
Before creating the switch, remove the physical port’s DHCP, static address, aliases, and IPv6 router-advertisement settings from /etc/rc.conf. For this guide, em0 should either be omitted or retained only as a layer-2 interface:
ifconfig_em0="up"For a static configuration, also remove the old defaultrouter entry after recording its value. The Standard Switch will own the host address and default route after creation. Editing rc.conf does not remove the address from the currently running interface, so do not restart networking between this step and creating the switch.
Create a Standard Switch
Section titled “Create a Standard Switch”Open Network → Switches → Standard, select New, and configure the switch:
- Enter
WANas the switch name. - Leave MTU and VLAN at their defaults unless your physical network requires different values.
- If
em0currently uses DHCP, enable DHCP. Enable Use DHCP Default Route because this is the node’s uplink. - If
em0has a static address, enter that same host address in CIDR notation under IPv4 Network, enter its next-hop router under IPv4 Gateway, and enable IPv4 Default Route. - Select
em0, or your equivalent physical interface, under Ports. - Under Bridge MAC source, select Use port MAC, then select
em0as the MAC source port. Confirm that an Effective MAC is shown. - Leave Private disabled so guests can communicate through the physical network.
- Leave Disable Bridge Offloads enabled.
- Select Create.
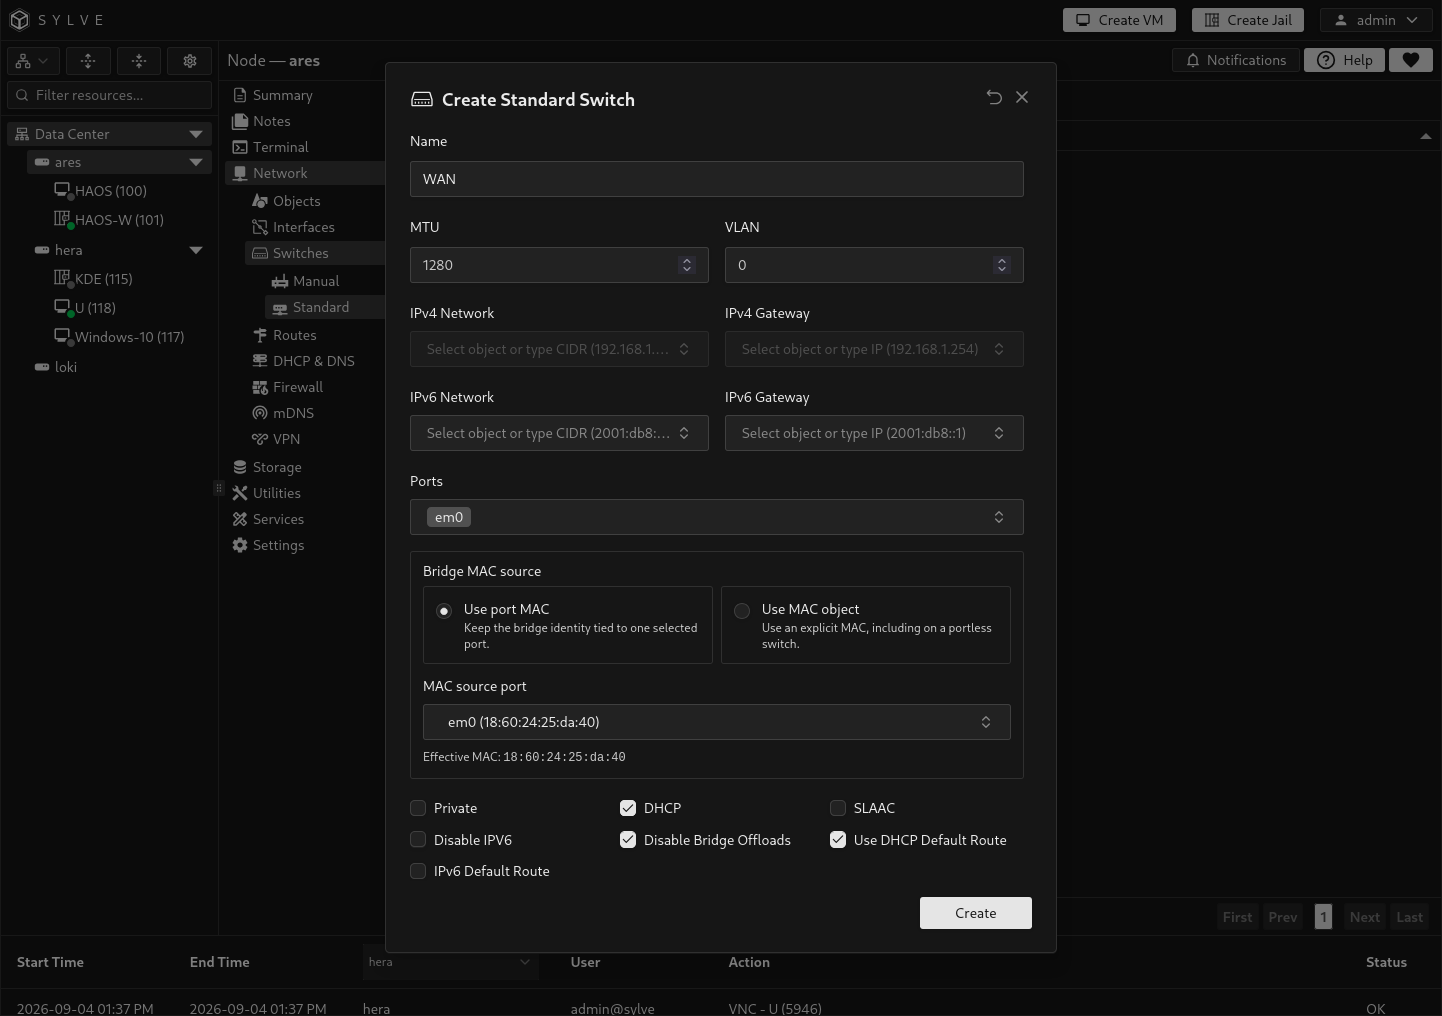
Because em0 still has its live management address, Sylve warns that converting it to a bridge member will remove that address. Confirm that the replacement configuration is present on the switch, then select Continue.
If a second warning says that em0 has configuration outside Sylve’s managed Standard Switches, select Cancel and check rc.conf again. Do not continue until DHCP, static addresses, aliases, accept_rtadv, and ownership by any other bridge have been removed from the physical port. Sylve’s confirmation does not rewrite that external configuration. The example below reports that em0 is still assigned to bridge0.
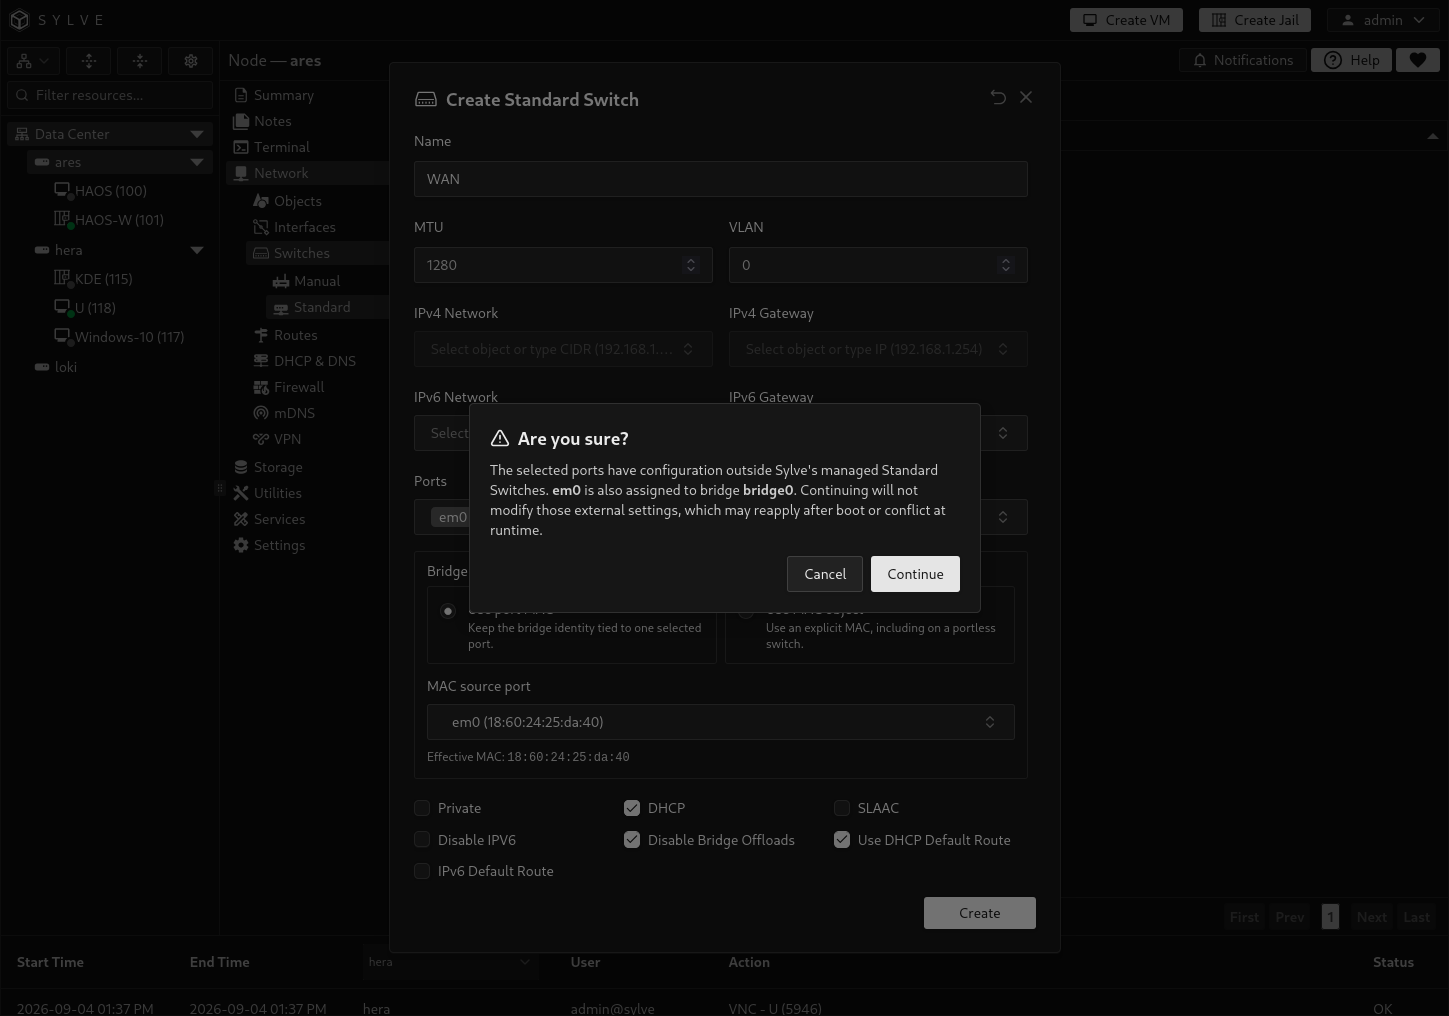
When the switch is created, Sylve clears the live addresses from em0, attaches it to a managed FreeBSD bridge, and applies the selected network configuration to that bridge. Keep layer-3 configuration off em0, and do not add the Sylve-managed bridge to rc.conf. Sylve manages the bridge from the saved Standard Switch configuration.
After connectivity returns, confirm that the WAN switch appears in the Standard Switches table. It should show em0 under Ports and either DHCP or the configured static address under IPv4. A DHCP lease is not guaranteed to reuse the node’s previous address, so reconnect using the address assigned to the bridge if it changes.
For a complete explanation of every field and network mode, see Standard Switches.
Download the Debian installer
Section titled “Download the Debian installer”Before creating the VM, add its installation ISO to the node’s Downloader library. This guide installs Debian 13.6 with the GNOME desktop environment using the official amd64 network installer:
https://cdimage.debian.org/debian-cd/current/amd64/iso-cd/debian-13.6.0-amd64-netinst.isoThe netinst image is intentionally small and retrieves most packages during installation, so the VM will need working internet access. We will select GNOME later in the Debian installer.
Open Utilities → Downloader, select New, and configure the download:
- Paste the Debian ISO URL into Source.
- Leave Optional File Name blank so Sylve uses the filename from the URL.
- Select Uncategorized (ISOs, IMGs, etc.) as the download type.
- Leave Ignore TLS Errors, Extract Automatically, and Auto-convert to RAW disabled. An installer ISO should be stored as-is.
- Select Download.
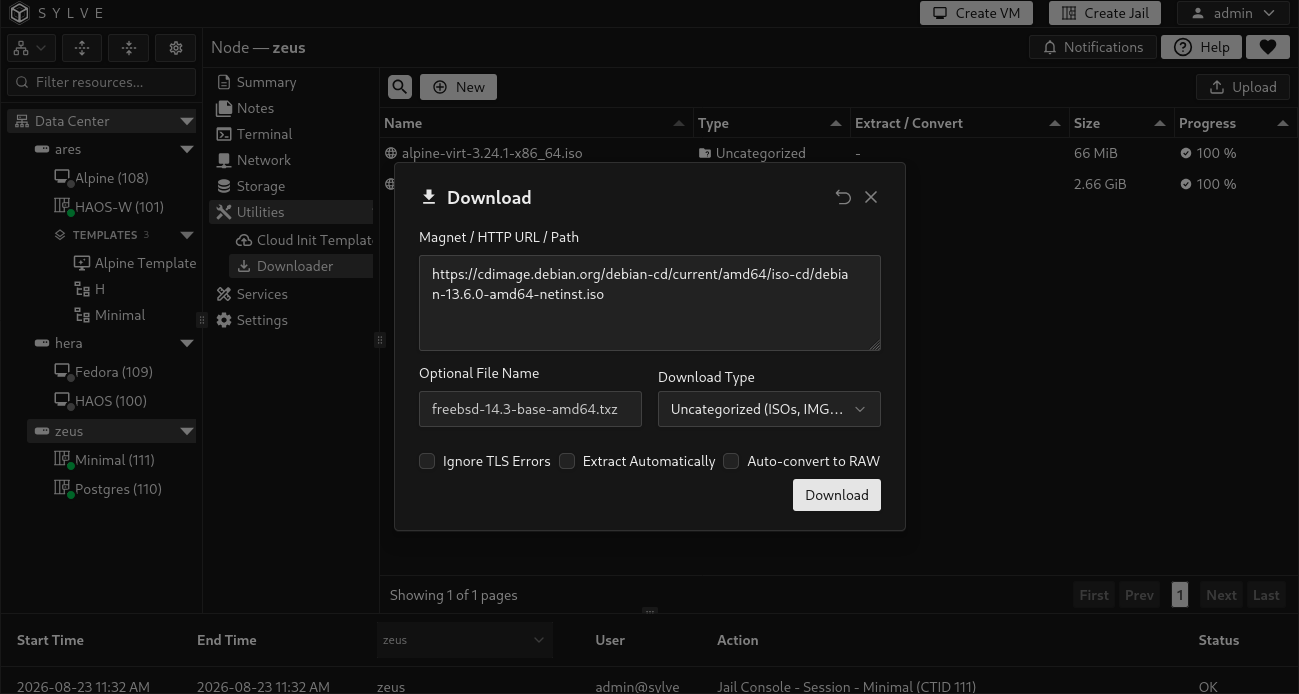
The dialog closes after the request is accepted. Watch the new row in the Downloader table while it moves through Pending and Processing. Continue only after its state is Done and the filename is debian-13.6.0-amd64-netinst.iso.
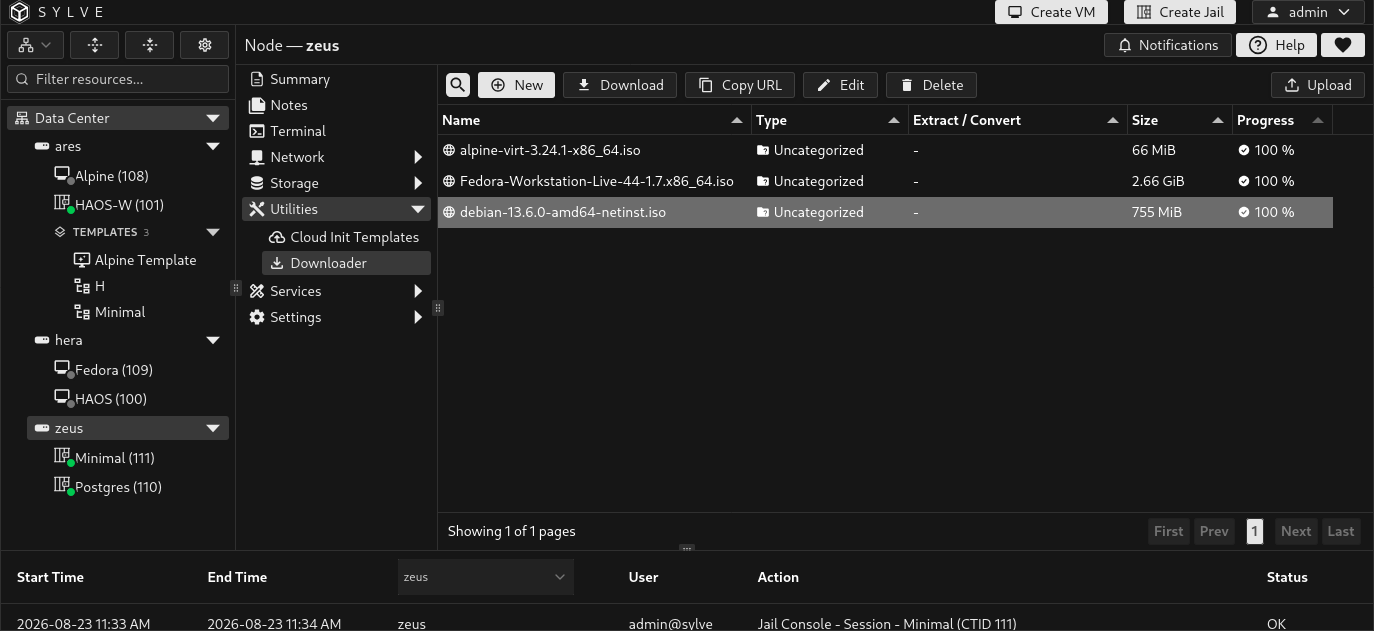
For other source types, uploads, processing options, and troubleshooting, see Downloader.
Create the virtual machine
Section titled “Create the virtual machine”Open Virtual Machines beneath your node and select Create VM. The creation wizard groups the VM’s identity, disk, network adapter, hardware allocation, and console settings into separate tabs.
The values below create a comfortable first Debian desktop VM with 3 vCPUs, 3 GiB of memory, and a 48 GiB disk. You may reduce or increase them to suit the resources available on your node, but remember that FreeBSD, ZFS, and any other guests also need memory and CPU time.
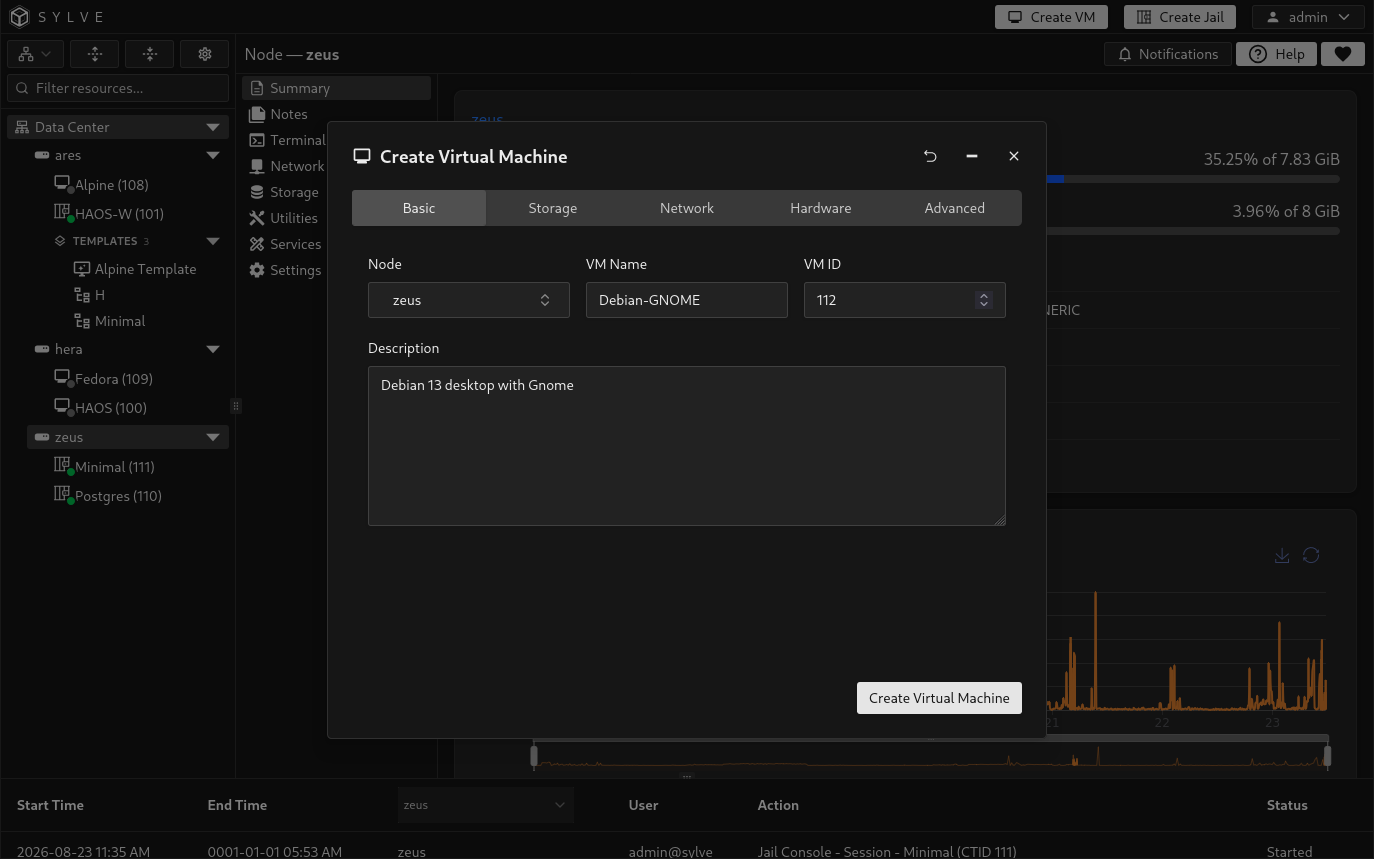
Use the Basic tab to identify the guest:
- Confirm that the correct Node is selected if the field is shown.
- Enter
Debian-GNOMEas the VM Name. - Keep the suggested VM ID unless you have a reason to use another available value.
- Enter a helpful description such as
Debian 13 desktop with Gnome.
The VM ID must be unique across both VMs and jails in the cluster. A clear name and description make the guest easier to find later.
Storage
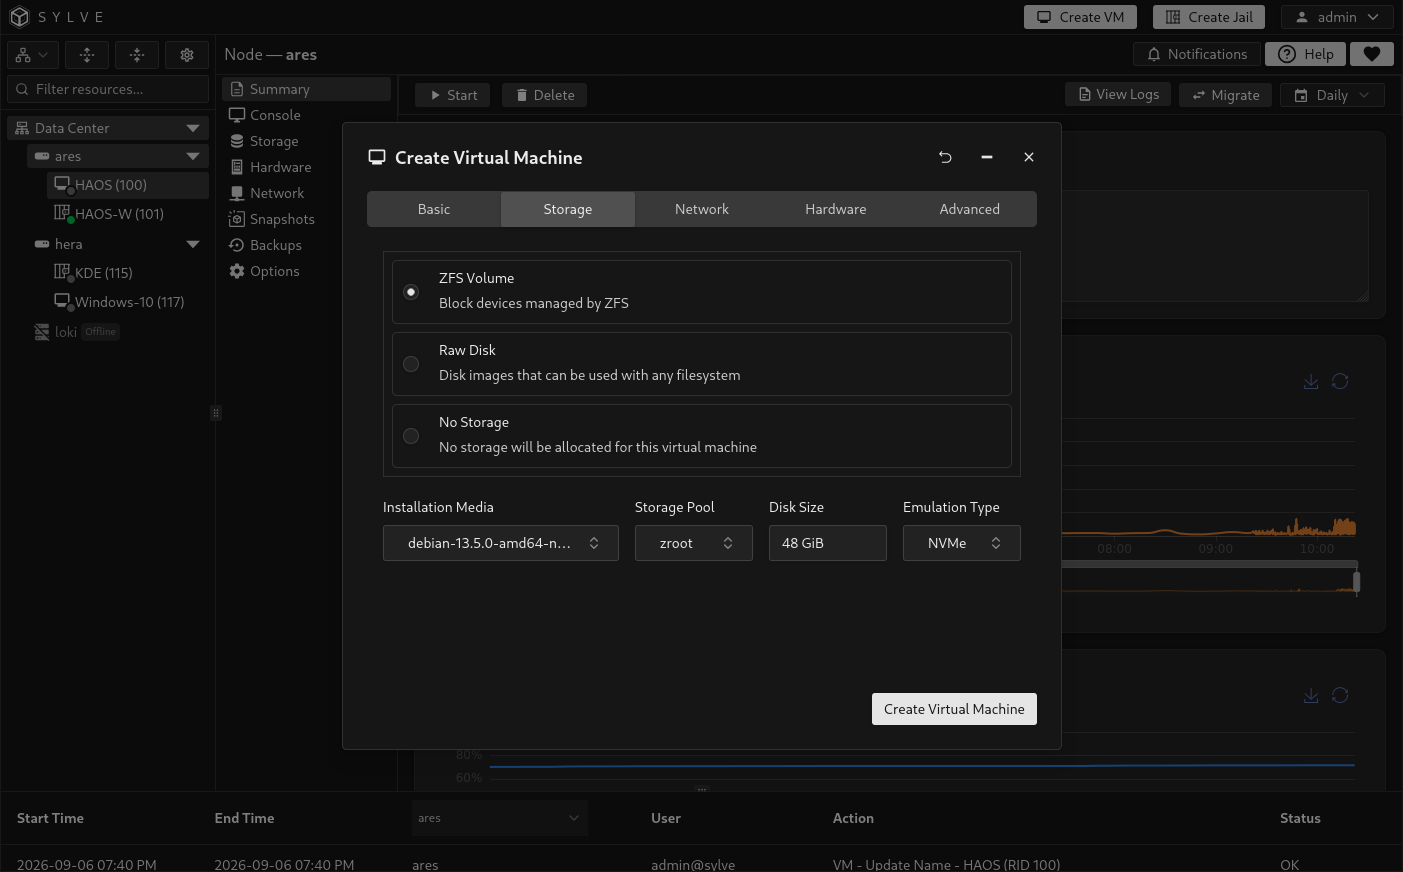
Section titled “Storage”Configure the VM’s boot disk and attach the installer:
- Select ZFS Volume. This creates a ZFS-managed virtual block device for the guest.
- Select
debian-13.6.0-amd64-netinst.isounder Installation Media. - Select
zrootunder Storage Pool, or the pool you want to use for the VM disk. - Enter
48 GiBfor Disk Size. - Select NVMe under Emulation Type.
Debian supports the NVMe controller without additional drivers. The ISO is installation media, while the 48 GiB ZFS volume is the persistent disk onto which Debian will be installed.
The creation wizard configures both attachments together. You do not need to use Add storage separately for this installation. After creation, the VM’s Storage page lists the writable disk as ZVOL with RW access and the read-only ISO as Media with RO access.
The screenshot below uses Debian 13.5 media. Select the installer downloaded earlier for this guide.
Network
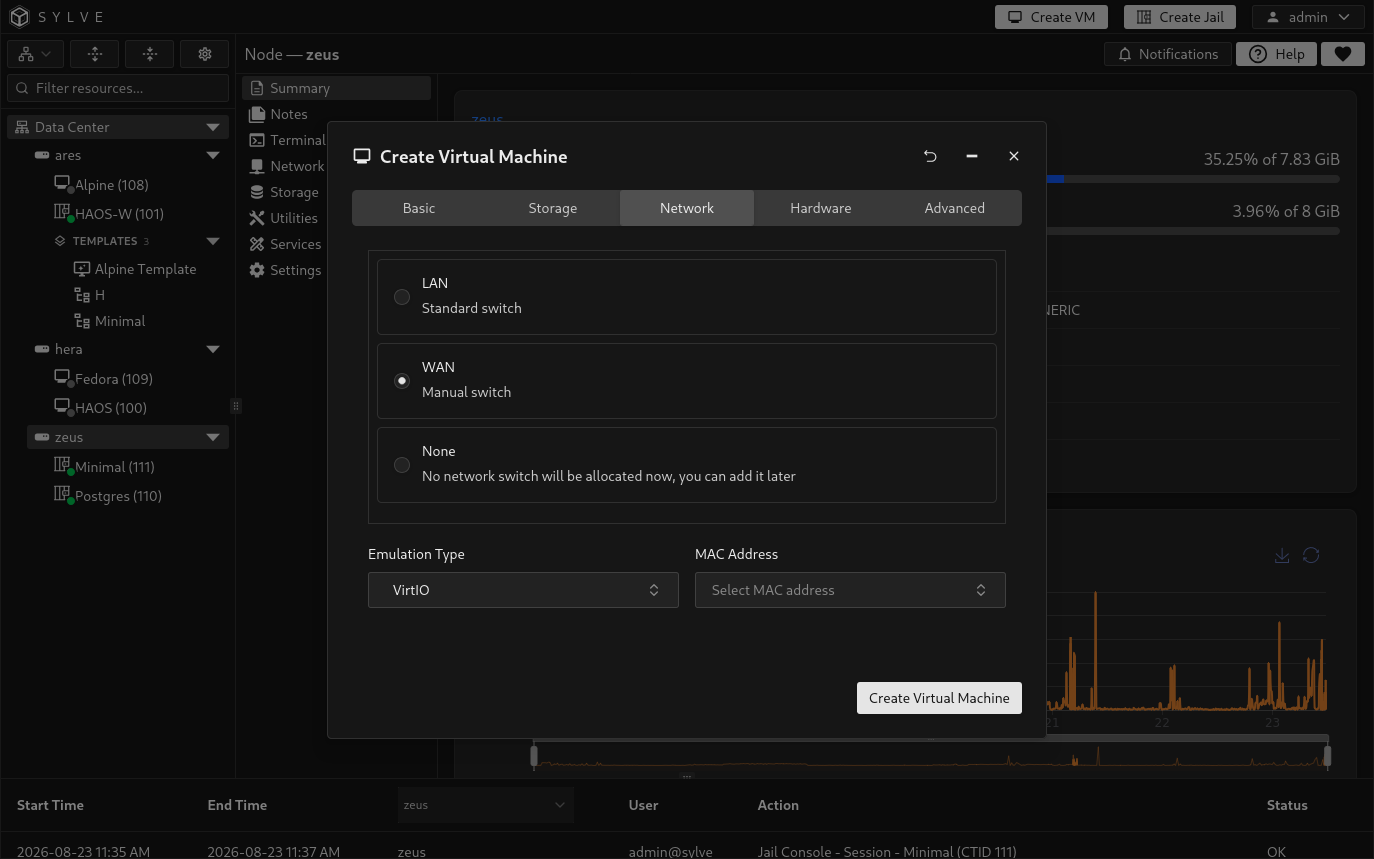
Section titled “Network”Connect the VM to the Standard Switch created earlier:
- Select
WANunder Switch. - Select VirtIO as the emulation type.
- Leave MAC Address unselected so Sylve generates and manages a unique address automatically.
VirtIO gives Debian an efficient paravirtualized network adapter. Selecting WAN plugs that adapter into the software bridge, allowing the installer and the finished guest to reach the same upstream network as the host.
Hardware
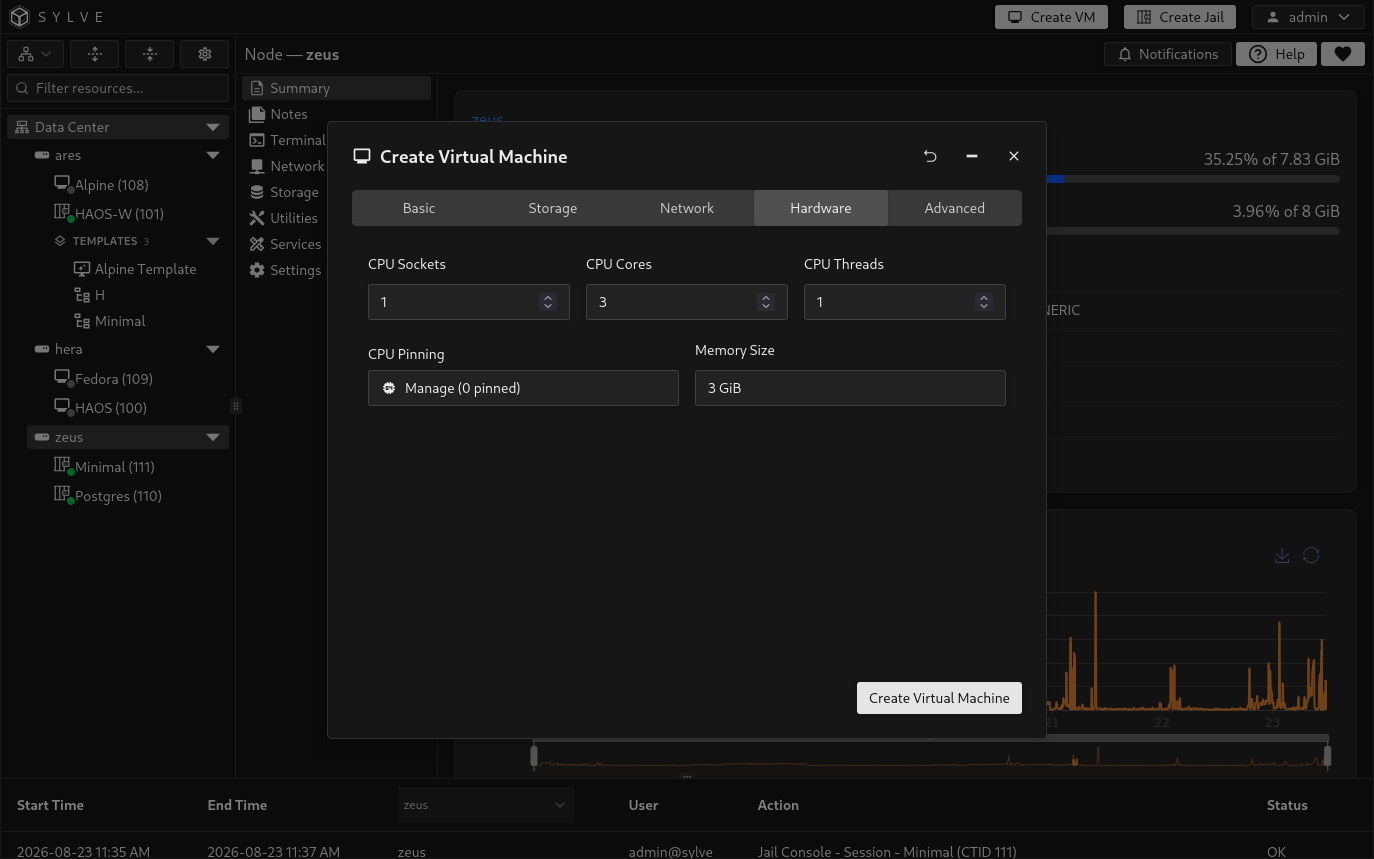
Section titled “Hardware”Allocate enough resources for the GNOME desktop:
- Set CPU Sockets to
1. - Set CPU Cores to
3. - Set CPU Threads to
1. Together, these values give the VM 3 vCPUs. - Enter
3 GiBfor Memory Size. - Leave CPU pinning and PCI Passthrough unconfigured.
CPU pinning and PCI passthrough are useful for specialized workloads, but neither is needed for this VM. Three GiB of memory is a practical starting point for Debian with GNOME without making the example unnecessarily large.
Advanced
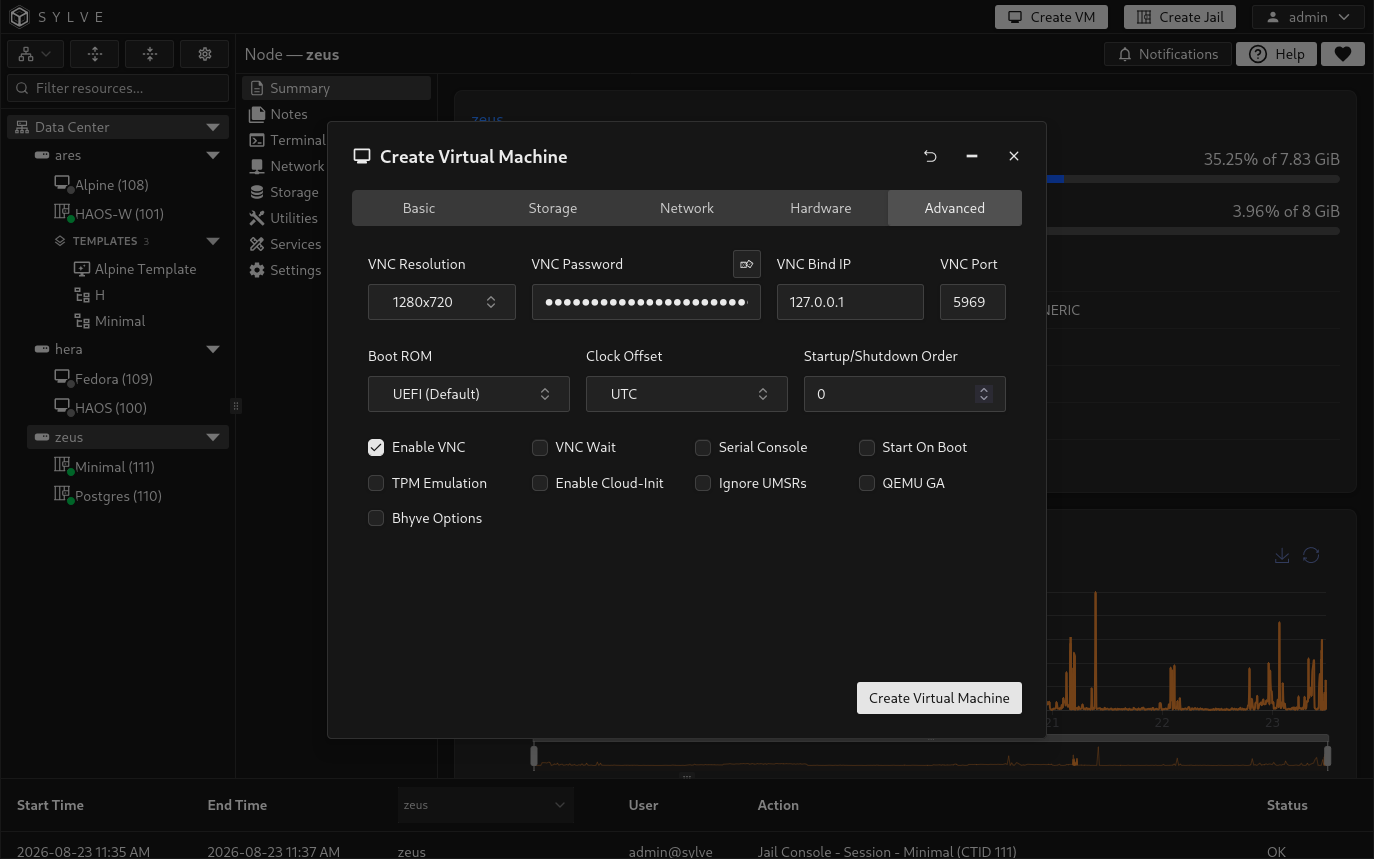
Section titled “Advanced”The graphical Debian installer requires a graphical console. Configure the final tab as follows:
- Keep Enable VNC enabled.
- Select a comfortable resolution such as
1280x720. - Keep the generated VNC Password and store it if you plan to connect with an external VNC client.
- Keep VNC Bind IP set to
127.0.0.1and use the automatically selected VNC port. - Leave VNC Wait and Serial Console disabled.
- Keep Boot ROM set to UEFI and Clock Offset set to UTC.
- Leave Start On Boot, TPM Emulation, Cloud-Init, Ignore UMSRs, QEMU GA, and Bhyve Options disabled for now.
Binding VNC to 127.0.0.1 avoids exposing the raw VNC server on the network. You will still be able to use Sylve’s built-in console after creating and starting the VM. Cloud-init is not used because this guide performs an ordinary installation from an ISO.
Finish creation
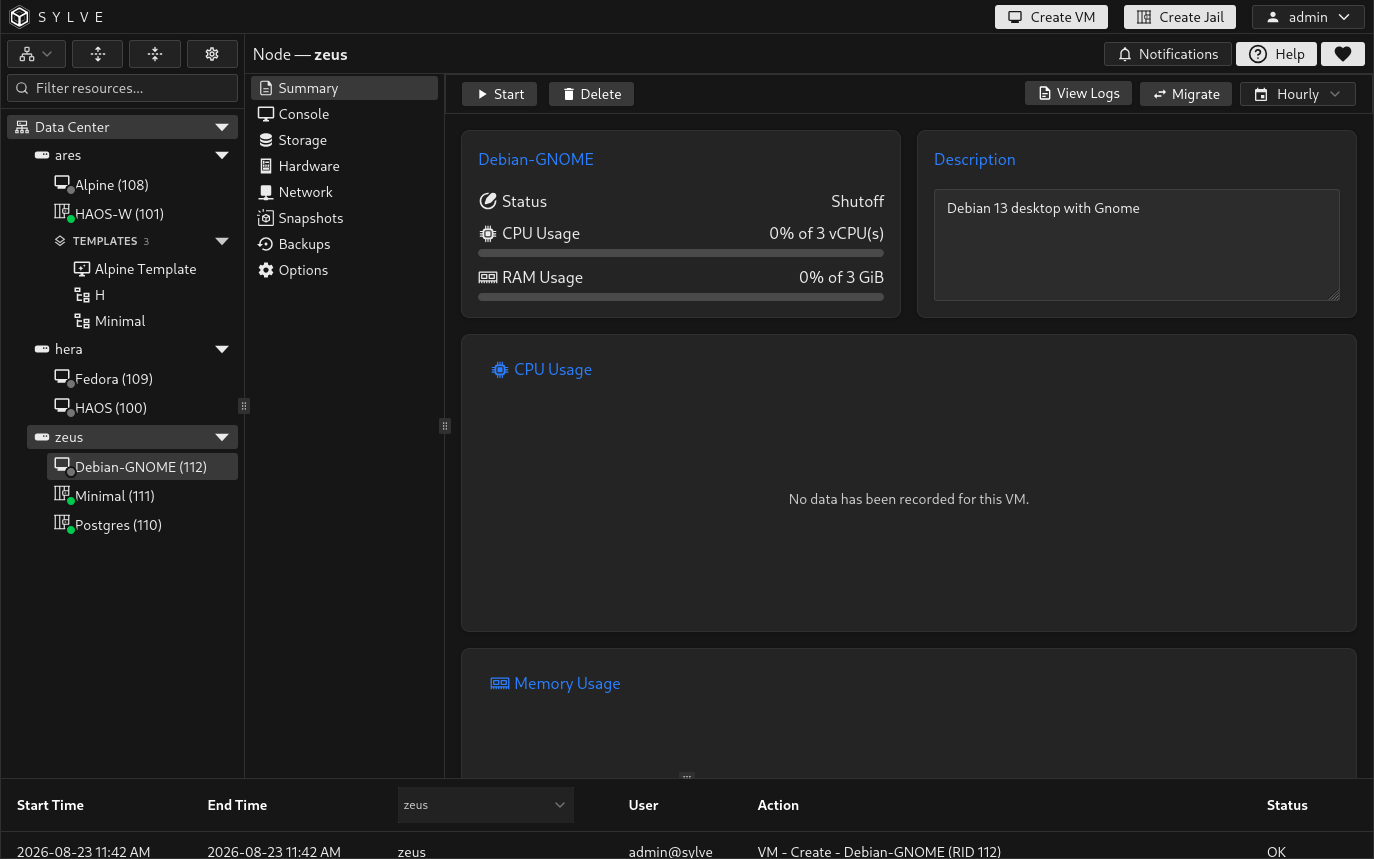
Section titled “Finish creation”Review each tab, then select Create. Sylve validates the VM ID, storage capacity, installation media, switch, hardware allocation, and console settings before creating the guest.
Do not start clicking through the Debian installer yet. The next section will start the VM, open its graphical console, and walk through installing Debian with GNOME.
For a detailed reference covering every field in the wizard, see Virtual Machine Creation.
Install Debian with GNOME
Section titled “Install Debian with GNOME”This section covers only the normal path through the Debian installer. Debian maintains a complete Debian 13 installation guide with detailed explanations, accessibility options, alternate partitioning layouts, troubleshooting, and advanced installation methods.
Start the VM and open its console
Section titled “Start the VM and open its console”From the new VM’s Summary page, select Start and wait for the start task to complete. Then open Console beneath the VM. Because VNC is enabled, Sylve displays the graphical framebuffer directly in the browser.
The VM should boot from debian-13.6.0-amd64-netinst.iso and show the Debian installer menu. Select Graphical install.
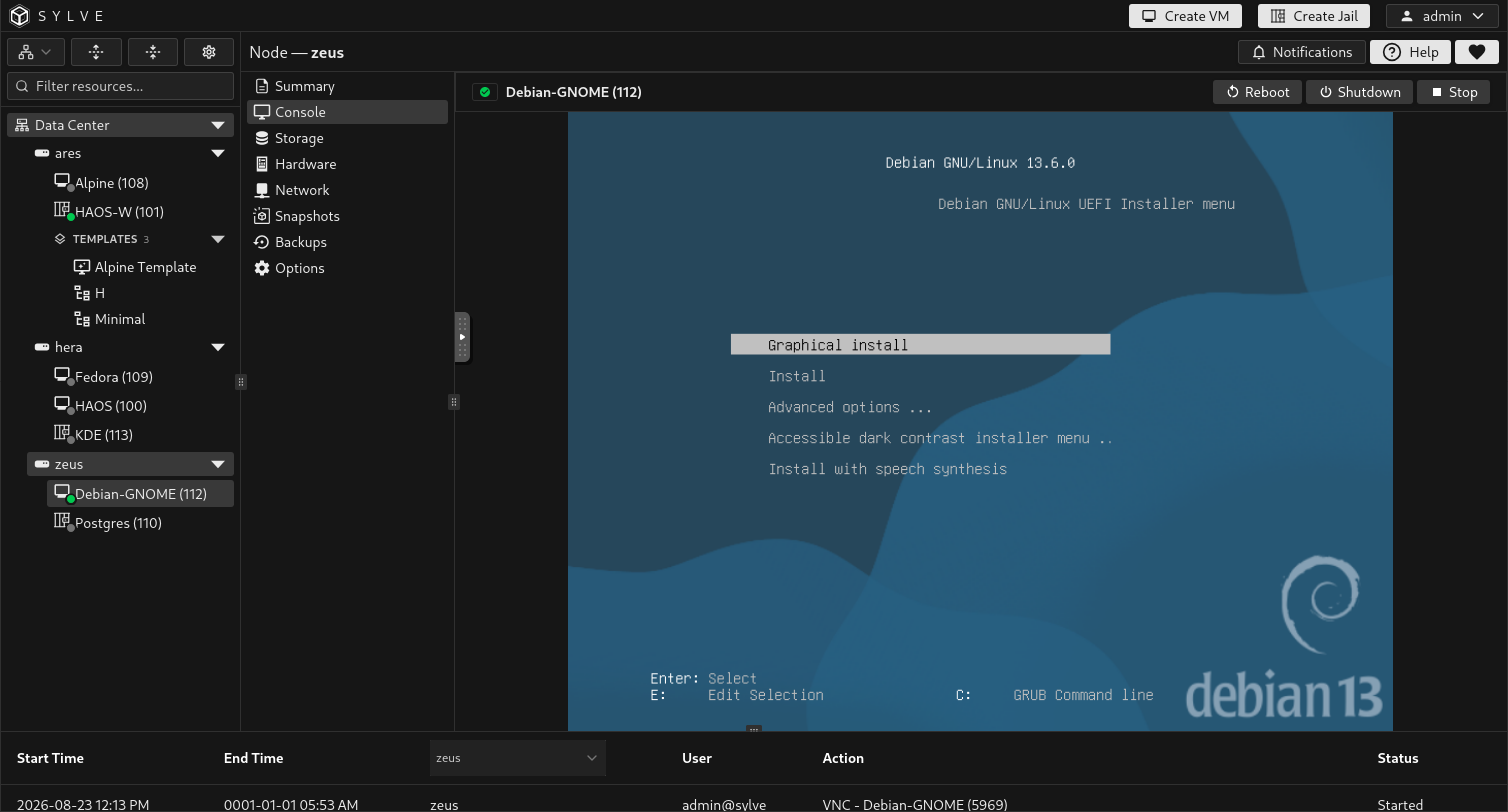
If the console reports that the VM is not running, return to Summary and confirm its state. If startup fails, use View Logs on the Summary page to inspect the error before trying again.
Complete the basic installer flow
Section titled “Complete the basic installer flow”Work through the installer using settings appropriate for your location and network:
- Select your language, location, and keyboard layout.
- Allow Debian to configure the VirtIO network adapter. On a typical home or office network, it receives an address through DHCP from the upstream router.
- Enter a hostname such as
debian-gnome. Leave the domain name blank unless your network uses one. - Configure the root account when prompted, then create your normal user account and password. Debian may skip the separate root password when the chosen installer flow configures the first user for administrative access instead.
- Select your time zone.
- For the simple layout used by this guide, choose Guided - use entire disk, select the 48 GiB virtual NVMe disk, and choose All files in one partition.
- Review the proposed partition layout, select Finish partitioning and write changes to disk, and confirm the write.
- Select a nearby Debian archive mirror and configure an HTTP proxy only if your network requires one.
- Choose whether to participate in the package usage survey.
The guided partitioner changes only the VM’s virtual disk. It does not repartition the FreeBSD host or the underlying ZFS pool.
Select GNOME and finish
Section titled “Select GNOME and finish”At Software selection, keep these items selected:
- Debian desktop environment
- GNOME
- standard system utilities
You may also select SSH server if you want to administer the guest over SSH after installation. Avoid selecting multiple desktop environments for this simple VM.
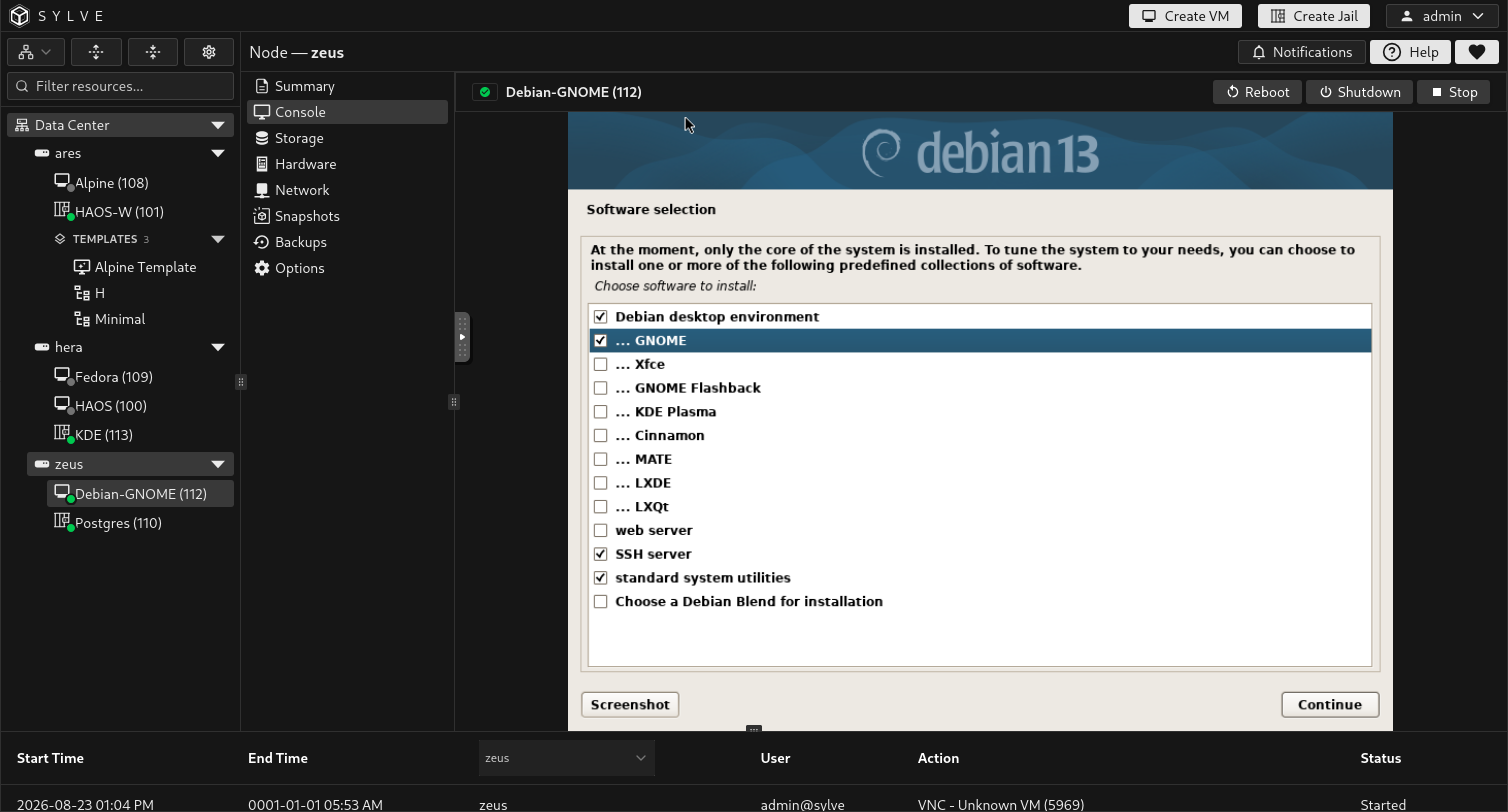
Continue and allow Debian to install the selected packages and boot loader. The netinst image downloads packages during this stage, so completion time depends on the VM’s network connection and the selected mirror.
When Debian reports that installation is complete, select Continue and allow the VM to reboot. If it returns to the installer instead of booting the installed system, stop the VM from Sylve before continuing.
Eject the installer ISO
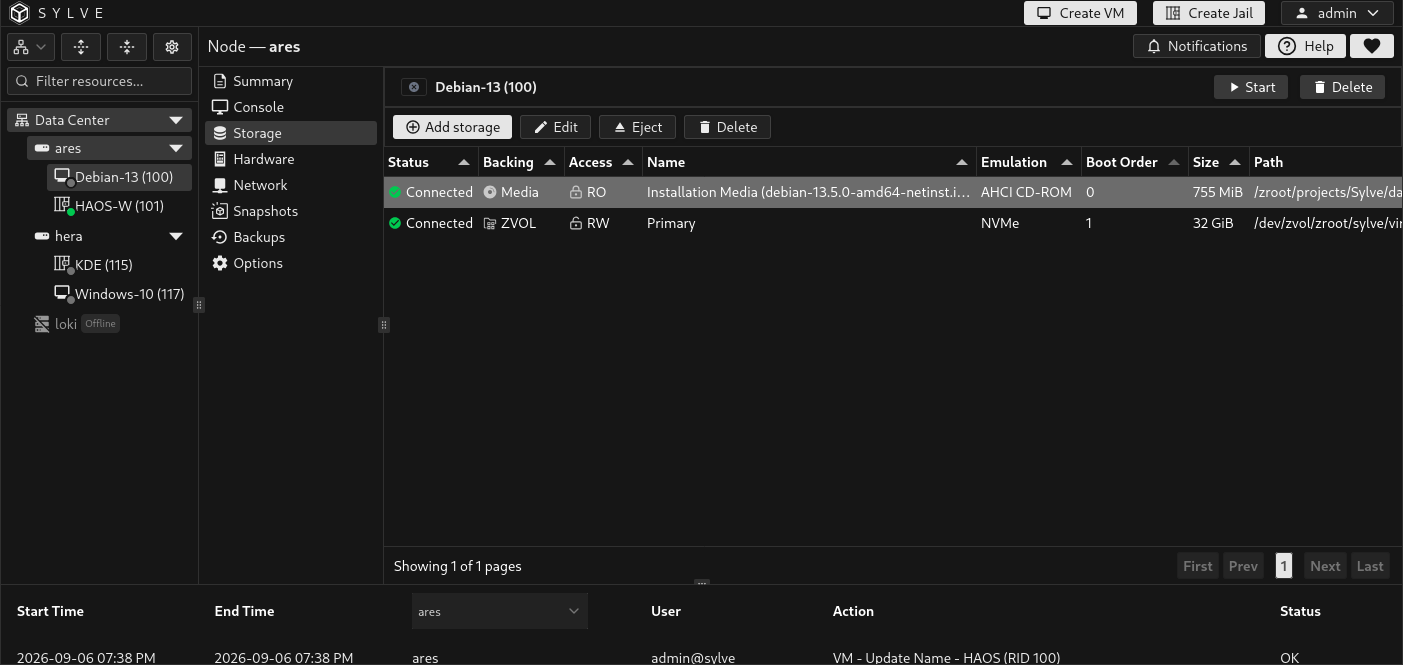
Section titled “Eject the installer ISO”Once the VM is powered off, open its Storage page:
- Select the Debian installer ISO row. Confirm that Backing is Media and Access is RO, so you do not select the writable system disk.
- Select Eject and wait for the action to complete.
- Confirm that the media row now shows Disconnected and the system disk remains Connected.
Ejecting leaves the attachment in the table and keeps the source ISO in Downloader. The VM will no longer boot from that media. To use it again, shut the VM off, select the same row, and choose Insert. You do not need to delete the attachment or add it again.
Storage attachments cannot be changed while the VM is running. If Debian already booted successfully from the virtual disk, shut it down cleanly before ejecting the ISO.
The example below uses a VM named Debian-13 with Debian 13.5 media and a 32 GiB system disk. Select the installer media in your own VM, not its system disk.
Start the VM again, open Console, and sign in to the GNOME desktop with the user account created during installation.
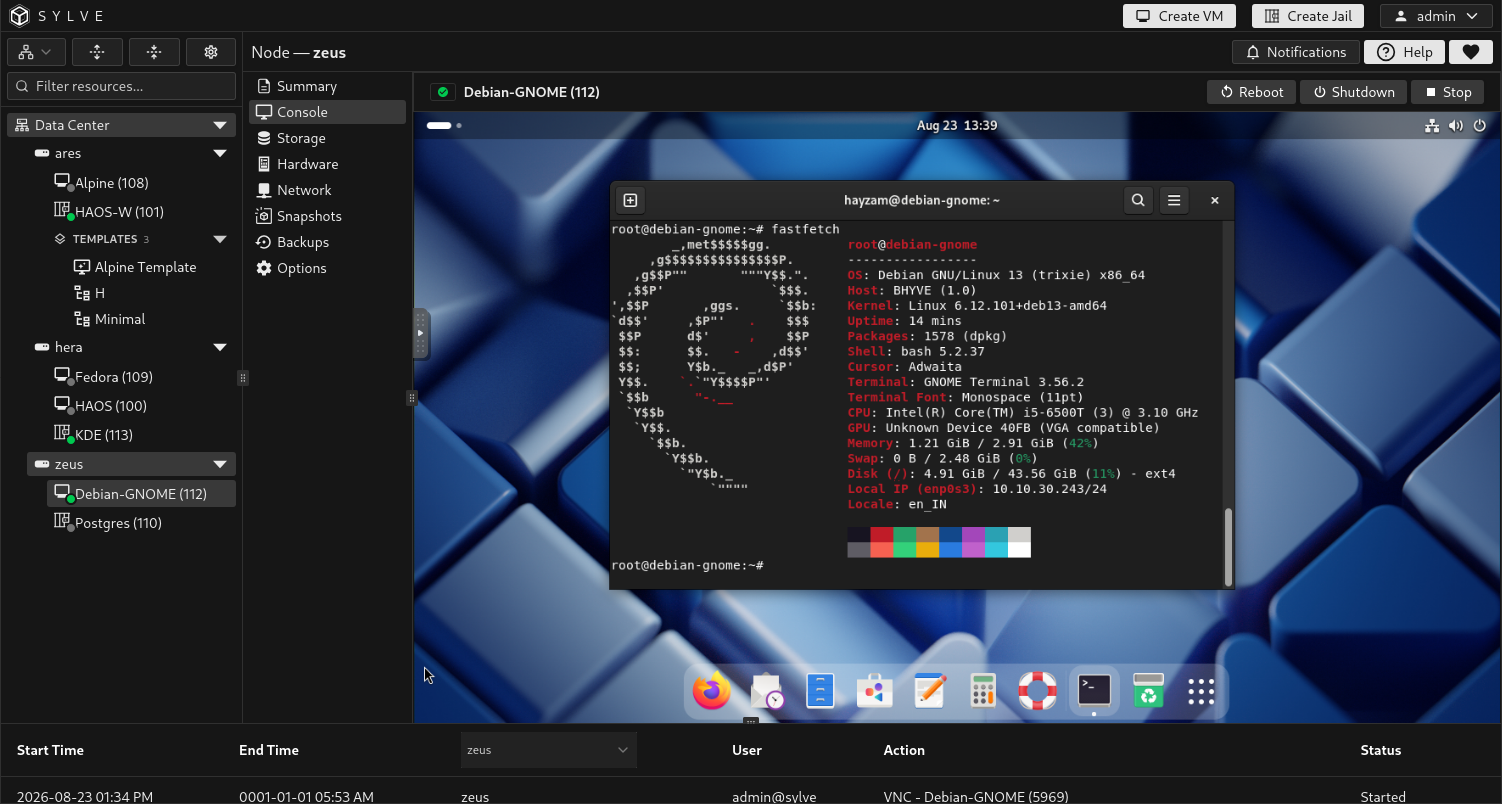
The VM is now installed and connected through the WAN Standard Switch. For more detail about graphical and serial access, see VM Console. For disk and installation-media management, see VM Storage.